Baltimore Barbecue Brisket Bacchanal

Two years ago, dear friends from Brooklyn relocated to Baltimore. Mercifully, so did Beth and Don’s legendary Memorial Day Barbecue.

We arrived Friday evening in time to hit a block party celebrating Open Walls Baltimore, the (remarkably well-lit) PerVerse poetry reading at Cyclops, Joe Squared for some fine coal-fired pizza, and Mount Royal Tavern–which is everything you want in a local bar.

Round about midnight–after several beers and an undisclosed number of glasses of wine–it was time to prep the meat. I had it in my head that I wanted to do a whole, untrimmed brisket, but it turns out those aren’t so easy to come by on a day’s notice. Somehow, overnight Don had managed to source a 13-and-a-half pound cut with a nice fat cap and well marbled flesh. Better yet, he’d gotten it from a local beef packer and slaughterhouse, J.W. Treuth & Sons, at a very reasonable price.

At home I’d assembled a dry rub of salt (about half a cup), hot Spanish paprika (1 tablespoon), cayenne (1 tablespoon), cumin seed (1 tablespoon), sugar (1 tablespoon) and black and green peppercorns (probably a quarter cup in total). I toasted the cumin and peppercorns in a cast iron skillet until they started to make popping noises and then ran them through my pepper grinder. (Note to self: must purchase dedicated spice grinder.)

A dry rub contains more salt than seems reasonable and needs time to be absorbed by the meat. There’s really no pretty way to do this, so I removed my jewelry and got intimate with the brisket.

Don had a lot more prep work to do, so I stuck around for a bit carting cuts of meat up from the basement and rooting for spices. He’s famous for his ribs. I learned a couple of his secrets, but I’m pretty sure I’d get in trouble if I shared, so this picture will have to suffice.

Beth spent Saturday baking such wonders as red velvet cake, cherry pie and a tunnel of fudge. Don fired up the smoker with apple wood, fig wood, and some other woods I can’t recall. I spent the day eating crabs (at Cantler’s in Annapolis) and tracking down the perfect summer sandal (at Ma Petite Shoe in Hampden). Later than night in Beth and Don’s backyard we ate mussels marinara brought by a guest who grasped the nature of a potluck but didn’t quite grasp the date of the party.

I’d made the mop sauce the night before leaving town. Having started the process at midnight, I was limited to items in my pantry and refrigerator. I managed to dig up four toasted dried whole New Mexico chiles, a red onion, a quarter cup of brown sugar, a whole bulb of elephant garlic, half a cup of molasses, a quarter cup of canola oil, a tablespoon of dried mustard powder, a couple of tablespoons of tomato paste, a quarter cup of tamari, half a cup of cider vinegar, most of a bottle of beer, a shot or so of tequila, some cumin, ground black and green peppercorns, miscellaneous hot sauce… You get the idea. I toasted the chiles in a cast iron pan and then pureed them in the small work bowl of my food processor along with the red onion, garlic and some of the liquid ingredients. I cooked this down in a pot, tasting and adding things as I went, until I was too tired to cook it any more. I think that the key here is that you want a very flavorful but balanced sauce that’s sweet, spicy, salty and tangy all at once.

The ribs and the brisket finished cooking on the grill while the smoker turned its attention to jerked chicken legs, pork shoulder and other meaty delights. I basted the brisket with a mop, periodically flipping the meat and adding layers of sauce to build up a nice caramelized crust on the meat. Flipping it was no joke.

The general rule of thumb is one hour per pound of meat, but it can take longer. Just be sure to keep the heat low so it doesn’t dry out. Our brisket, which had mysteriously shrunk to 12.5 or 13 pounds after some of the menfolk came home from a bar crawl the night before, probably spent 10 hours in the smoker and another three hours on the grill. At this point, I pulled it off the grill and began slicing–thin and against the grain to maximize the tenderness.

The brisket never actually made it to the buffet table. Folks appeared in the kitchen, plates in hand and devoured the slices as fast as I could cut them. At some point, the thicker end went back in the smoker and Don turned his attention to the ribs. He moved them to the lower rack of the grill and glazed them with his own homemade sauce. This time, as I carved the meat, folks didn’t bother with plates.

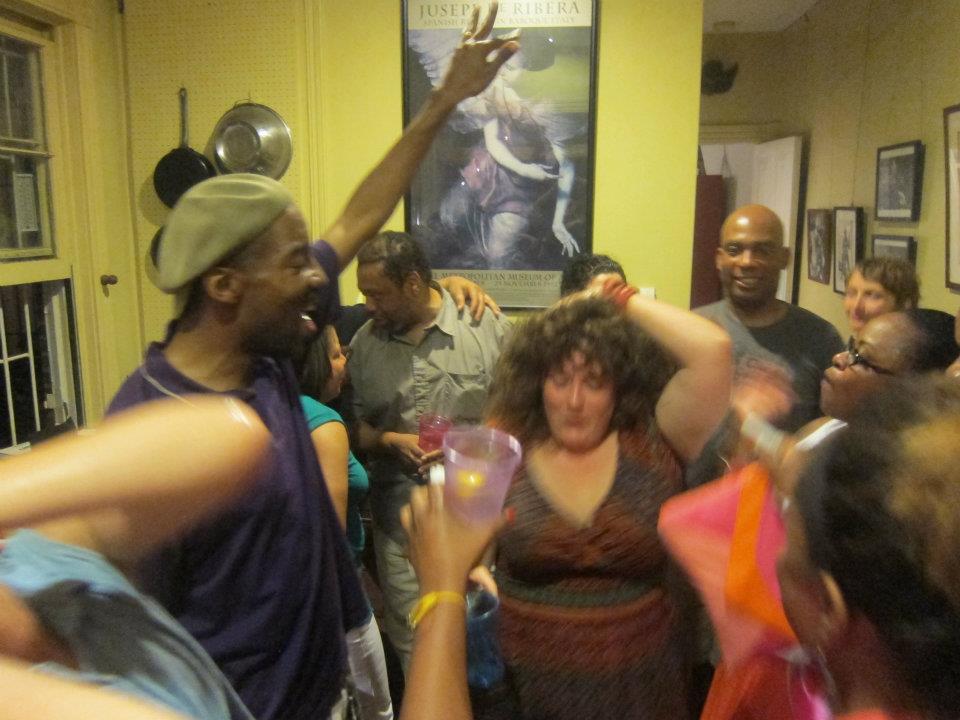
From here things get a little blurry. Kindly eaters swung by the grill bearing offerings of beer, wine and a lethal rum punch. We thanked them with bits of blood sausage, antelope, duck and venison. I hear there was python, but I must have been otherwise occupied at that point. In the words of one of the revelers (whose last name, and I am not making this up, is Bacchus):

For several hours there was a tribute to Don Cornelius in the kitchen with revelers lined up on either side dancing and sweating where in order to get to the patio and grill or back to the veggie and dessert spread in the dining room, you had to strut yourself on a Soul Train line!

And thus Brooklyn and Baltimore worked it off and worked it out on the dance floor…

Image

Absinthe Soup

Image

I’ve been battling a cold for the past couple of weeks. Tonight I made the difficult decision to skip a show to which I already had tickets. Instead, I came home and continued to work my way through the frozen soup collection I’ve been amassing.

On those winter days when it’s too cold to think about going out, I spend my time cooking up large batches of soup using whatever I have on hand. I eat it for as many meals as I can stand and freeze the rest. The plastic pint containers that you get when ordering takeout or buying olives are perfect for a single serving. The key here is to be diligent about labeling each container with the date and the contents.

Tonight’s freezer exploration turned up a particularly tasty soup that I made back in January. I had hosted a cocktail party at which I served bagna cauda, a dip of butter and/or olive oil with garlic and anchovies. I like to add some red pepper flakes and parsley. You serve it warm (hence the translation: “hot bath”) with raw winter vegetables and hunks of bread for dunking. The bagna cauda paired brilliantly with both the Prosecco and the Negronis.

The next morning found me with a headache, sticky counters, and a bunch of leftover fennel, endive and cauliflower. The vegetables were beginning to brown where I had cut them. Delicate spinach intended for a salad was also begging to be consumed.

There are a few basic formulas for making soup. This one involves sweating the aromatics, adding the vegetables, gently simmering them in broth, and then pureeing the mixture. That’s it.

The absinthe was a last-minute addition that took the soup to a new level. Tonight it almost made me forget that I am missing Beth Ditto’s performance. Hopefully a cough syrup nightcap will finish the job.

Absinthe Soup

  • 3 tbsp butter
  • 2 tbsp olive oil
  • 1 red onion, diced
  • 1 fennel bulb, diced
  • 4 cloves garlic, pressed
  • 2 tsp fennel seed
  • pinch cayenne
  • pinch powdered ginger
  • pinch nutmeg
  • 2 cups chicken stock, 2 cups water
  • ⅛ cup absinthe
  • ½ head cauliflower
  • 2 bunches spinach
  • 1 head endive
  • salt
  • pepper
  • sherry vinegar
  • lemon juice
  • garnish with plain yogurt, fennel fronds, fennel pollen
  1. Melt the butter with the olive oil over medium-low heat. Add the red onion and fennel and cook stirring frequently so that they do not brown.
  2. When the onion and fennel are soft and becoming translucent, add the garlic, fennel seed, cayenne, ginger and nutmeg. Cook stirring constantly for a minute or two.
  3. Add the chicken stock, water, endive and cauliflower and simmer gently until the cauliflower is soft. Add the spinach and absinthe and simmer for another 10 minutes – or maybe less. (You want the spinach to retain its bright green color.) Puree using an immersion blender or in batches in a food processor or traditional blender.
  4. Taste and adjust the seasoning as desired with salt, pepper, sherry vinegar and/or lemon juice. Ladle each serving into a bowl and garnish with plain yogurt, fennel pollen and the fennel fronds.

Gumbo in 10 (or So) Easy Steps

I made gumbo for the third time on Friday and was pleased to see that, once you have the basic concepts down, there are an endless number of ways to riff on this tasty one-pot dish. Pictured here is Friday’s creation, which featured bacon, smoked Louisiana sausage, Maine shrimp tails, okra and mustard greens (these first three ingredients being just a sampling of the proteins lurking in my cramped freezer). Some might consider the mustard greens to be heresy, but I thought that they made for some nice flavor and texture contrast.

What follows is a step-by-step documentation of my very first gumbo. By following these steps, you can make a delicious gumbo using whatever meats, seafood, stock and produce you have on hand. It’s a great way to clean out the freezer.

STEP 1  –  Gather a bunch of meat and brown it in batches in a nice big heavy-bottomed pot. In this case, we have duck breast, andouille sausage, kielbasa and smoked hog jowl.

STEP 2  –  While you’re browning the meat, dice your veggies. Celery, onion and green pepper (“the holy trinity” of Cajun cooking) are traditional. Carrot, red bell pepper and garlic are nice additions. You can also add jalapenos or other hot chile peppers, if you’re into that kind of thing.

STEP 3  –  Transfer browned meat to an even bigger heavy-bottomed pot, add liquid and begin to simmer. An odd beer, some leftover red wine, clam juice and homemade stock from last Thanksgiving’s turkey carcass are just fine. (In the case of the shrimp gumbo pictured above, I used the shrimp shells along with some garlic, celery, carrot, a bay leave and whole black peppercorns to make a quick stock. You could also use a ham hock, which is a great thing to keep stashed in the freezer for soup and stew emergencies.)

STEP 4  –  Now it’s time to make the roux. Add approximately as much flour as you have rendered fat from browning all of that meat and start whisking. If you’re low on fat, you can supplement with whatever hard fat you have on hand – butter, schmaltz, lard, vegetable shortening, etc. A cup of fat and a cup of flour will do you right for one large pot of gumbo.

STEP 5  –  Keep whisking. I recommend NPR podcasts to keep you company.

STEP 6 – Now would be a good time to crack open a beer. But don’t stop whisking. The key is not to let it burn.

STEP 7  –  When you can’t stand to whisk any more, you’ve got your roux. If you taste it, it will not be yummy. Do not be scared.

STEP 8  –  Add your chopped vegetables into the roux and stir frequently until they start to soften. Toss in some herbs. Fresh or dried thyme, oregano and basil are all welcome. Cayenne, paprika and other dried chiles can also be added. Then dump it all, plus some bay leaves into the really big pot with the simmering meat.

STEP 9  –  Let is simmer and simmer and simmer. At some point, you’ll want to pull any large hunks of meat out and shred them. Maybe turn the burner off, lid the pot and take a nice bike ride. While you’re out, pick up some really cheap french bread to serve with the finished product. It’s traditional.

STEP 10  –  Fire the burner back up and keep simmering. Taste and adjust seasoning with salt, pepper, whatever hot sauces you have in the fridge, maybe a little more wine, some vinegar, etc. Make a batch of Sazeracs. Make another batch. Make some long-grain white rice. Add some okra, some chopped up oysters, some parsley and anything else your heart desires. Have some more Sazeracs. Just don’t get so drunk that you forget to take a picture of the finished product. Oops.

Fromage Fort

Image

This one is so easy I feel a little guilty. I recently hosted a wine tasting at which I served a selection of cheeses.

OK, fine, I did more than taste the wine. It was all I could do to toss the remaining cheese hunks into a plastic container and shove that into the fridge before my face hit the pillow. Four weeks later, I unearthed the container and found a triple-cream Brie, some aged Gouda and a little nugget of Fourme d’Ambert that were beginning to assume one another’s identity.

I had a hazy memory of a French cheese dip that was made for just such a situation. A quick search led me to fromage fort. Traditionally, it’s made with white wine, garlic, fresh herbs and black pepper. I skinned the Brie and pinched off hunks that I dropped into the food processor along with the Fourme d’Ambert and the aforementioned wine and seasonings (thyme being the only fresh herb I had on hand). The Gouda was hard, so I grated it with a rasp—one of my all-time favorite kitchen tools. I ran the processor for a few minutes and sampled the results, which were a little boozy. I had some leftover Ricotta and a rapidly aging Romano in the fridge, so in they went to provide balance.

Now it was starting to taste good. Never one to leave well enough alone, I decided to see what I could do to improve upon the flavor and create a nice complement to tomorrow night’s Sazeracs and gumbo. Dried mustard, cayenne, smoked paprika and just a pinch of sugar created a well-balanced cheese dip that you could eat with a spoon. I did.

Plantanos Maduros

I’m not a big dessert person, but last weekend I took a stab at a plantain tart as part of my Cinco de Mayo menu. I had purchased the plantains a few days ahead of time and left them (along with my avocados) in a paper bag with a couple of apples in the hopes that they would ripen. Not so much. The plantains’ disappointing starchiness was offset by some vanilla ice cream, homemade cajeta and a liberal dose of margaritas. (The guacamole, on the other hand, was perfection.)

After 10 days languishing on my counter, the last plantain had turned a solid black and was begging to be consumed. I took a small nonstick skillet and brought it up to medium temperature with half a tablespoon of butter inside. I peeled the plantain, sliced it an angle and dropped the slices into the pan. Once they had started to brown and crisp up, I flipped them. A few minutes later, a tablespoon of apple cider vinegar went in to deglaze the plan and steam the plantain. I tossed a pinch of salt in and flipped the slices a couple of times to glaze them with the reduced butter/vinegar mixture. They went onto a plate where I drizzled them with a tablespoon of the leftover cajeta. You could do worse for a Monday night dinner.

Kale for Breakfast

I could eat kale for every meal and be a happy girl. Braised kale topped with a fried egg is one of my favorite quick weeknight dinners. But something about this kale’s particular curliness, coupled with the items left over from last weekend’s Cinco de Mayo cooking extravaganza, suggested a different technique.

I brought a cast iron pan up to medium temperature and added just a little olive oil. In went some thinly sliced red onion, followed a little later by a thinly sliced jalapeno pepper. I rinsed the kale, bunched it and finely shredded it just before adding to the pan. I added some pepper and smoked sea salt and let it cook, stirring occasionally, while I prepped the rest of the dish.

A couple of months ago, while lolling on my couch nursing a hangover, I found myself pondering why restaurant scrambled eggs are so delicious. A Google search led me to Gordon Ramsay’s technique, which yields light, creamy eggs and is pretty much foolproof. Basically, you take a pot (not a pan), crack your eggs directly into it, add a knob of butter and bring it up to medium heat, stirring frequently with a heatproof spatula. Add salt at the end. Yep, that’s it. And you don’t have to use the rather excessive amount of fat that he suggests. In this instance, I used a single jumbo egg, about half a teaspoon of butter and just a dash of salt.

By the time I finished the eggs, the dry-frying technique had imparted a crispy, slightly smoky quality to the kale. I dropped it into a bowl and drizzled a little good quality olive oil (from Frankies) on top. I nestled my scrambled egg and added some sliced avocado for a little extra richness. It was delicious.

Quick Springtime Lunch

Image

My local farmers market is really starting to pick up. Mindful of the excessive amount of kale still in my fridge, I limited myself to radishes, scallions, turnips, carrots and thyme. (More on those last three later.) Having hit the gym on the way home, I wanted a quick but virtuous lunch.

I started with half of a whole wheat flatbread. I am a big fan of these because they keep in the refrigerator pretty much forever and can be dolled up an infinite number of ways. I heated up my cast iron skillet and toasted the bread on both sides before applying a layer of ricotta cheese, which is a great source of quick protein that also keeps in the fridge. I added a layer of thinly sliced radishes. In a moment of inspiration, I decided to use the already-hot skillet to grill strips of scallion in a teaspoon or so of olive oil. Freshly ground pepper, fleur de sel and a light drizzle of truffle oil topped my springtime tartine.

It was fresh but lush, and it screamed out for a crisp white wine. Lo and behold, there was an open bottle of Gruner Veltliner on the top shelf of the refrigerator. OK, maybe lunch wasn’t all that virtuous.