Eat Your Veggies

I’ve taken on a full CSA share this year. This is an ambitious quantity of vegetables, even for a serious vegetable lover. My goal is to keep some staples on hand that will allow me to convert pretty much anything into a quick weeknight meal. Whole wheat flatbread and ricotta cheese are on the list.

Image

Tonight I seasoned the ricotta with nutmeg. I used a vegetable peeler to shave thin slices of zucchini and marinated them in lemon juice, fresh basil and a fruity olive oil. I topped it off with a few sliced cherry tomatoes and some scallions that I halved and grilled in the same cast iron pan that I used to toast the flatbread. When making something this simple, it’s important to season each element.  I added salt and pepper as I went and then sprinkled a little fleur de sel over the top.

I ate this with some green leaf lettuce dressed with Greek yogurt, white wine vinegar, a minced garlic scape, pepper and a bit of honey. For dessert I polished off some strawberries that were definitely not going to keep through my long weekend in Sonoma. Then I turned a bag of leafy greens over to my appreciative neighbor and dragged out the suitcase.

The Kale Caesar Cure

That last margarita was definitely not necessary. I awoke this morning to a trail of clothes leading from the front door to the kitchen, where I had stopped off to grab a glass of water before planting my face in a pillow. Note that I did not actually drink the water, despite the advice of the drag queen in house slippers who read our palms on a dimly lit street corner somewhere in the West Village. But that’s another story.

Something healthy and restorative was in order.

Image

Kale Caesar

  1. Heat a cast iron skillet to medium-low with half a tablespoon of butter and a thinly sliced garlic glove.
  2. Cube a slice or two of stale bread. (I had some sourdough rye on hand.) Add the pieces to the skillet, stirring to coat. Add some salt and pepper, turn the heat down to low and stir occasionally while you continue your preparations. If you have not figured it out yet, the goal here is quick croutons.
  3. Hard boil an egg. Put an egg in a small saucepan, add water to cover and place over high heat. When the water comes to a boil, wait a minute or two, then turn off the heat and let the hot water continue cooking your egg for about ten minutes. Drain the water and cool the egg quickly by adding a couple of rounds of cold water and maybe even some ice. (This helps ward off that greenish gray ring that screams Continental breakfast at a crappy chain hotel the morning after your friends’ wedding.)
  4. Toss the following ingredients into a food processor or mash together with the back of a fork: 3 anchovies (I used sardines because I had an open tin), juice of 1 lemon, 1/2 tablespoon Dijon mustard, 1/2 tablespoon mayonnaise, 1 clove garlic, pinch of cayenne, pinch of sugar, black pepper.
  5. Rinse and finely shred your kale. I went with some young lacinato, which is also known as dinosaur kale, that I got in last week’s CSA share.
  6. Add the kale, dressing, croutons, some grated parmesan or romano cheese, and a pinch of smoked sea salt if you’ve got it. Toss the salad and add your peeled, sliced egg.

This plus an iced coffee and I am feeling a good bit better. Now if I can just figure out how to get the remaining glitter off of my eyelids before this afternoon’s babysitting gig.

Summer Solstice Salad

Yesterday was the summer solstice. Here in New York City, we hit 97 degrees though it apparently felt like 102. Con Edison warned of likely power outages. My coworkers and I did our part by working with the lights off, which had a calming effect on an otherwise nutty day. I worked late, but it was still steamy by the time I got off the train in Brooklyn. It was 8:00 and I was hungry, but there was no way I was creating any more heat in my stuffy apartment.

Summer Solstice Salad

1 scape, thinly sliced (shallots, garlic and red onion would all work here)
1 tablespoon Greek yogurt
2 tablespoons red wine vinegar
1 tablespoon good quality olive oil
Juice of 1/2 lemon
1 teaspoon dried oregano (fresh would be even better, as would Italian flatleaf parsley, chives, etc.)
Pinch sugar
Fresh-ground pepper
1 can chickpeas, rinsed and drained
1 sweet red pepper, minced

  1. Combine all but the last two ingredients in a jar and shake vigorously. Then combine with the chickpeas and red pepper in a bowl.
  2. Now root around the fridge and pantry and see what you’ve got. I had some red leaf lettuce, baby heirloom tomatoes, feta and oil-cured olives. Hearts of palm or artichoke hearts would have been an excellent contribution from the pantry.
  3. Pack half of your lightly marinated chickpeas away for a future snack, toss everything together in a wooden bowl, and grab a fork. I find that salad for one is best eaten directly out of the bowl.

Midway through my meal, there was a gentle rap at the door. I grabbed my trusty wooden bowl and the remaining strawberries and joined my neighbors on the roof. The sun was just finishing its descent and there was a cool breeze in the air. Wine was poured. Plants were watered. Berries were eaten. And thus concluded the longest–and perhaps hottest–day of the year.

20120622-101253.jpg

CSA Strawberries

  1. Pick up one quart of strawberries from CSA and take them home.
  2. Put strawberries in colander and rinse gently.
  3. Eat strawberries standing at the kitchen counter. Yes, the whole quart. At some point, you may conclude that wasting even a bit of the perfectly ripe flesh around the stem is unacceptable and just pop the strawberries in your mouth whole, leaves and all. This is a reasonable solution.

20120616-105244.jpg

A Note on Chile Peppers

This week continues to be challenging. I didn’t make it home until around 9:00 last night, by which time I was ravenous. I keep corn tortillas on hand for just such a situation. A few tortillas, half a tablespoon of olive oil, a red onion, a sweet red pepper, a jalapeño, some feta and the less brown half of an abandoned avocado became my dinner in about 15 minutes.

Image

The tacos were tasty but, in my haste, I forgot a few key tips for working with chile peppers.

  1. Cut off the tip and taste to assess hotness. Each pepper is unique. I’ve had jalapeños as mild as a green bell pepper. I’ve had jalapeños that were scorching. Let’s just say that my lower lip is looking a little bee stung today.
  2. If the pepper is hot, minimize skin contact. When you cut a pepper, you release capsaicin, the chemical that creates that delicious hot feeling. The more you cut it, the more you release. Some folks recommend wearing plastic gloves. I used to think this was ridiculous–until I met some seriously hot habaneros while making black bean dip. My hands stung for about 24 hours and were tingly for a few days after that. I tried milk. I tried oil. I tried vinegar. I tried harsh detergents. Nothing but time worked. I have yet to buy gloves, but I do make an effort to only touch the outside of the pepper and let my knife do most of the work.
  3. If your hands do absorb the heat, BE VERY CAREFUL what you touch. You can generally gauge whether one of your fingers is tainted it by sucking on it a bit. You could also gauge this by removing your contacts or by touching some mucus membranes (think soft, fleshy pink parts), but I DO NOT recommend this technique.
  4. If you want to minimize the heat, remove the ribs (the white part on the inside) and the seeds. If you are in a hurry and do not bother with this, you may end up with some very zesty tacos. Obviously, if you really want to amp your dish up, go for the whole thing.
  5. Using multiple sources of heat will yield a more complex flavor. In the case of these quick weeknight tacos, I stuck to the jalapeño and some fresh-ground black pepper. But, when I’m making chili or some other slow-cooked dish with layers of flavor, I generally go with a combination of fresh and dried chiles, chile powder, and/or hot sauce.
  6. Use caution when cooking chile seeds. If you’ve got a soup or a stew or some kind of braise going on, no worries. If you’ve got a hot cast iron pan with minimal oil, you may end up burning the seeds. If you live in a small one-bedroom apartment with no cross ventilation, this could be rather unpleasant. Boys and girls, can you say “pepper spray”?

Quick Roasted Roots

By Monday afternoon it was clear that this was going to be a rough workweek. I made it home by 8:00 the next night, but I still had some urgent work to do. And I was seriously hungry. In the crisper, I found some (slightly moldy) turnips, carrots and a garlic bulb that were left over from a trip to the farmers market a few weeks back. I could work with this.

Image

Most home cooks know how to roast root vegetables in the oven. (Toss the vegetables in olive oil, salt and pepper; spread them in baking pan; and roast at 400-450 until they are cooked.) But sometimes it’s just too hot or you are just in too big a hurry to consider turning on the oven. Here’s a basic technique for roasting root vegetables on the stovetop.

  1. Bring a cast iron skillet up to medium heat with just a little oil. In this case, I used a tablespoon of olive oil.
  2. Add your aromatics. I used six whole peeled garlic cloves, which I toasted in the oil until they were fragrant and starting to brown. You could also use onion, shallots, garlic scapes, leeks, etc.
  3. Dice your roots and add to the pan. I used three medium turnips (with the moldy bits cut off) and seven carrots, which yielded enough food to pack away an extra serving for some future food emergency. You could also use rutabaga, potatoes, beets, parsnips, any hard squash, yams, fennel, and probably a bunch of other things I’m not thinking of.
  4. Stir occasionally. You want to allow each piece prolonged contact with the cast iron to promote delicious crispy bits. This also allows you time to log into your work email and put out a few fires.
  5. Add seasoning. I used sea salt, cayenne, black pepper and dried thyme. Fresh herbs would be nice–rosemary, parsley and the like.
  6. Make it a meal. The cupboard is pretty bare at the moment, so I went with a frozen Boca Burger that had seen better days. A piece of sausage, a turkey burger or a fried egg would work. Just push your vegetables to one side of the pan to make room to cook your protein and you’ve got some seriously easy cleanup!

Thirty minutes after walking in the door, I had finished work for the night and was sitting down to a healthy dinner. And lo, there was a glass worth of Vouvray left in the bottle.

How to Cook Greens

Dark leafy greens are one of my diet mainstays. The darker, the better. They’re packed with nutrients, including vitamins A, C and K. They’re high in fiber. They provide a nice dose of calcium and iron. They keep well in the fridge. They’re delicious. And they can be your dinner in under 20 minutes…

Image

This is a basic technique that I’ve used with collard greens, kale, mustard greens, spinach, dandelion greens, chard, radish greens, turnip greens, broccoli rabe, beet greens, snow pea leaves and arugula. You should riff on it as you see fit based on your tastes and whatever ingredients you have on hand.

  1. Heat some fat in a pan. You don’t need much–a tablespoon or so for a whole mess of greens. You can use olive oil, vegetable oil or something from the pork family, preferably smoked. For the greens picture above, I used an ounce of very lean slab bacon, which I rendered with a couple of teaspoons of olive oil.
  2. Add aromatics. Now you want to flavor your oil with whatever aromatics you have on hand–onions, garlic, ginger, shallots, etc. I am partial to red onion and thinly sliced garlic. Here I used some garlic scapes. I also like to add a little hot dried pepper at this stage.
  3. Add greens. Make sure to rinse them well, as they tend to be gritty. But don’t bother to dry them; the water left on the leaves will help to steam them in the pan. You may want to slice them. If the stems are particularly tough, remove them or add them to the pan first so that they get a head start on cooking. Greens need more or less time to cook depending on their type, the time of year, how mature they are, how cooked you want them, etc. I am partial to greens that still require some serious chewing. Traditional Southern greens are cooked until they are silky and falling apart. If you want them more cooked, you can always add more liquid (water or chicken broth are nice) and even lid the pan.
  4. Finish with salt, pepper and a little acid. Lemon juice, tomatoes, apple cider vinegar and red wine vinegar all add a nice counterpoint to the lush mouthfeel of cooked greens. For the kale above, I used white wine vinegar and regular apple cider, which added a little sweetness to what were some very bitter greens. (A pinch of sugar would also do the trick.) You can also add some more heat and complexity at this point by deploying some hot sauce. You can cook for a bit longer to reduce the liquid if you like, but don’t cook it all away. Pot liquor is delicious!
  5. Make it a meal. Sometimes the greens alone are enough for dinner, particularly if I’ve used andouille or turkey sausage back in Step 1. Sometimes I add a fried egg. Sometimes I serve these up in corn tortillas with feta, salsa and avocado. Sometimes I use the greens as a sauce for whole wheat pasta. I ate this purple kale with some ricotta and a slightly sweet, buttery Vouvray.

Whore’s Radishes

Spending the better part of a day preparing a lavish dinner for friends is a meditative and restorative activity for me. But at 8:30 on a Tuesday night, I just want to get something tasty and nutritious into my stomach as quickly as possible.

Image

I opened the fridge to discover that the greens atop these radishes were beginning to wilt. If you haven’t caught on by now, I am a bit obsessed with dark leafy greens. Last summer, unable to bear the thought of throwing out such a bounty of greenery (and after having Googled to ensure that they were not poisonous), I decided to try eating the radish greens. They’ve got a slightly rough texture and a bitter, peppery flavor similar to the radish itself, but much more subtle. That is to say, they are delicious.

Tonight I prepared the radishes and radish greens alla puttanesca, which translates as “whore’s style.” There are a number of variations on this, but they all include a variety of savory ingredients–including tomatoes, garlic, onions, chiles, anchovies, capers and olives. Note that these are ingredients that keep well in the pantry or fridge, ready to deliver a burst of flavor whenever you need it.

For this dish, I added a couple of anchovy filets, a tablespoon of olive oil, half a tablespoon of butter (to promote browning), one thinly sliced garlic scape (regular garlic would have been fine, but it’s what I had), and a big pinch of red pepper flakes to a cast iron skillet over medium heat. After a few minutes of stirring, I had a nicely seasoned browned butter. In went the radishes, cut into wedges. I was getting some nice color on them, but they weren’t cooking as quickly as I had hoped, so I added some water to help them along. When the water was nearly gone, I added the radish greens (which you want to wash a little more thoroughly than I did, as they tend toward gritty) and sautéed them. At the last moment, I threw in a tablespoon of capers and 10 or so oil-cured olives that I had chopped and pitted. I finished the dish with some ricotta cheese for a little protein. This would be awesome with some whole wheat pasta.

Image

Scapes and Squid

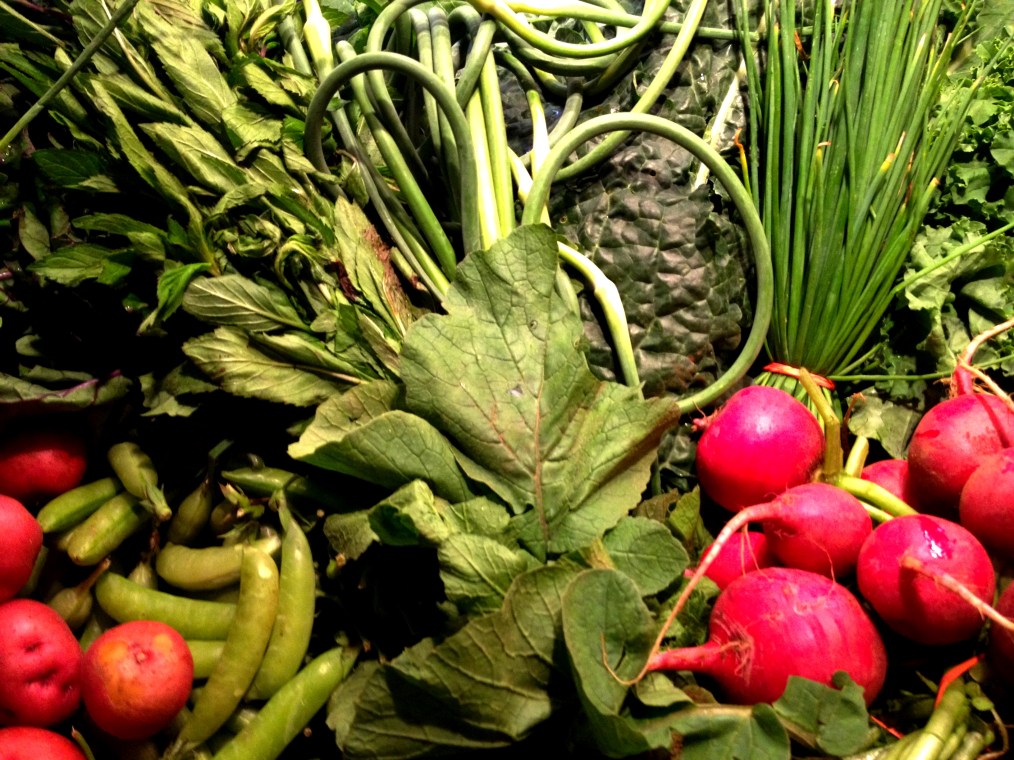
I’ve been traveling a lot, but this weekend was all about Brooklyn. Prospect Heights, Crown Heights, Park Slope, Clinton Hill, Williamsburg, Bushwick, Boerum Hill, Sunset Park and a 24-hour diner in Bay Ridge were all on the agenda. My friend Dana and her girlfriend Kathleen were coming for dinner on Sunday, so I swung by the Grand Army Plaza Greenmarket. It was, indeed, quite green. I came home with three kinds of kale, mint, chives, baby red jacket potatoes, radishes, sugar snap peas, and garlic scapes. (I also bought squid, hot turkey sausage and slab bacon, but had a tough time working them into this composition.)

Image

I was first lured into buying scapes a few years ago; something about their sinuous curves proved irresistible. A scape is a stem that shoots up from the garlic bulb and produces a small flower. Farmers trim them so that their garlic bulbs will continue to grow. They’re similar to garlic in flavor, but not as sharp. Scapes are tasty cooked, but I think they really shine when eaten raw. Here’s just one in an endless number of riffs on scape pesto. (Note that it freezes beautifully.)

Scape Pesto

  • 6 garlic scapes, ends and tips removed
  • 1/3 cup marcona almonds (you could use regular almonds, walnuts, pine nuts, etc., though I would recommend lightly toasting them first)
  • zest and juice of one lemon
  • 3 tablespoons olive oil (good quality, because this isn’t going to be cooked)
  • 30-40 fresh mint leaves (this could be basil, parsley, cilantro, etc.)
  • salt and fresh-ground black pepper (to taste)
  • pinch of sugar (if needed)

Blend the first five ingredients in a food processor, adding water a little at a time  to loosen the mixture enough that it becomes a rough paste. (You could also just add more olive oil, but we’ve got bacon and butter coming further down the page.) Add salt, pepper and, if needed, a pinch of sugar to taste.

I’d texted Dana from the greenmarket to confirm that she eats squid. Her reply came just as I walked in the door: “I eat squid, but am not the hugest fan ever.” The pressure was on. I didn’t really have a plan, but had gotten it in my head that I wanted to make a single dish that married the scapes, squid, potatoes and sugar snap peas into a sort of warm composed salad.

Image

A lot of people find the prospect of cooking squid intimidating, but it’s easy. The key is to cook it very quickly (grilled, fried, boiled or sautéed) or to cook it very slowly (in a traditional Italian red sauce or a fisherman’s stew perhaps). Anything in between yields the rubbery texture of late-night diner calamari.

Scapes and Squid

  • 3 cloves pressed garlic
  • 2 tablespoons olive oil
  • 1 tablespoon red wine vinegar
  • pinch each of dried oregano, Aleppo pepper and red pepper flakes
  • smoked sea salt and fresh-ground black pepper
  • 1.5 pounds cleaned squid

Combine all ingredients and let sit for at least one hour and up to six hours.

  • 1 batch scape pesto (see above)
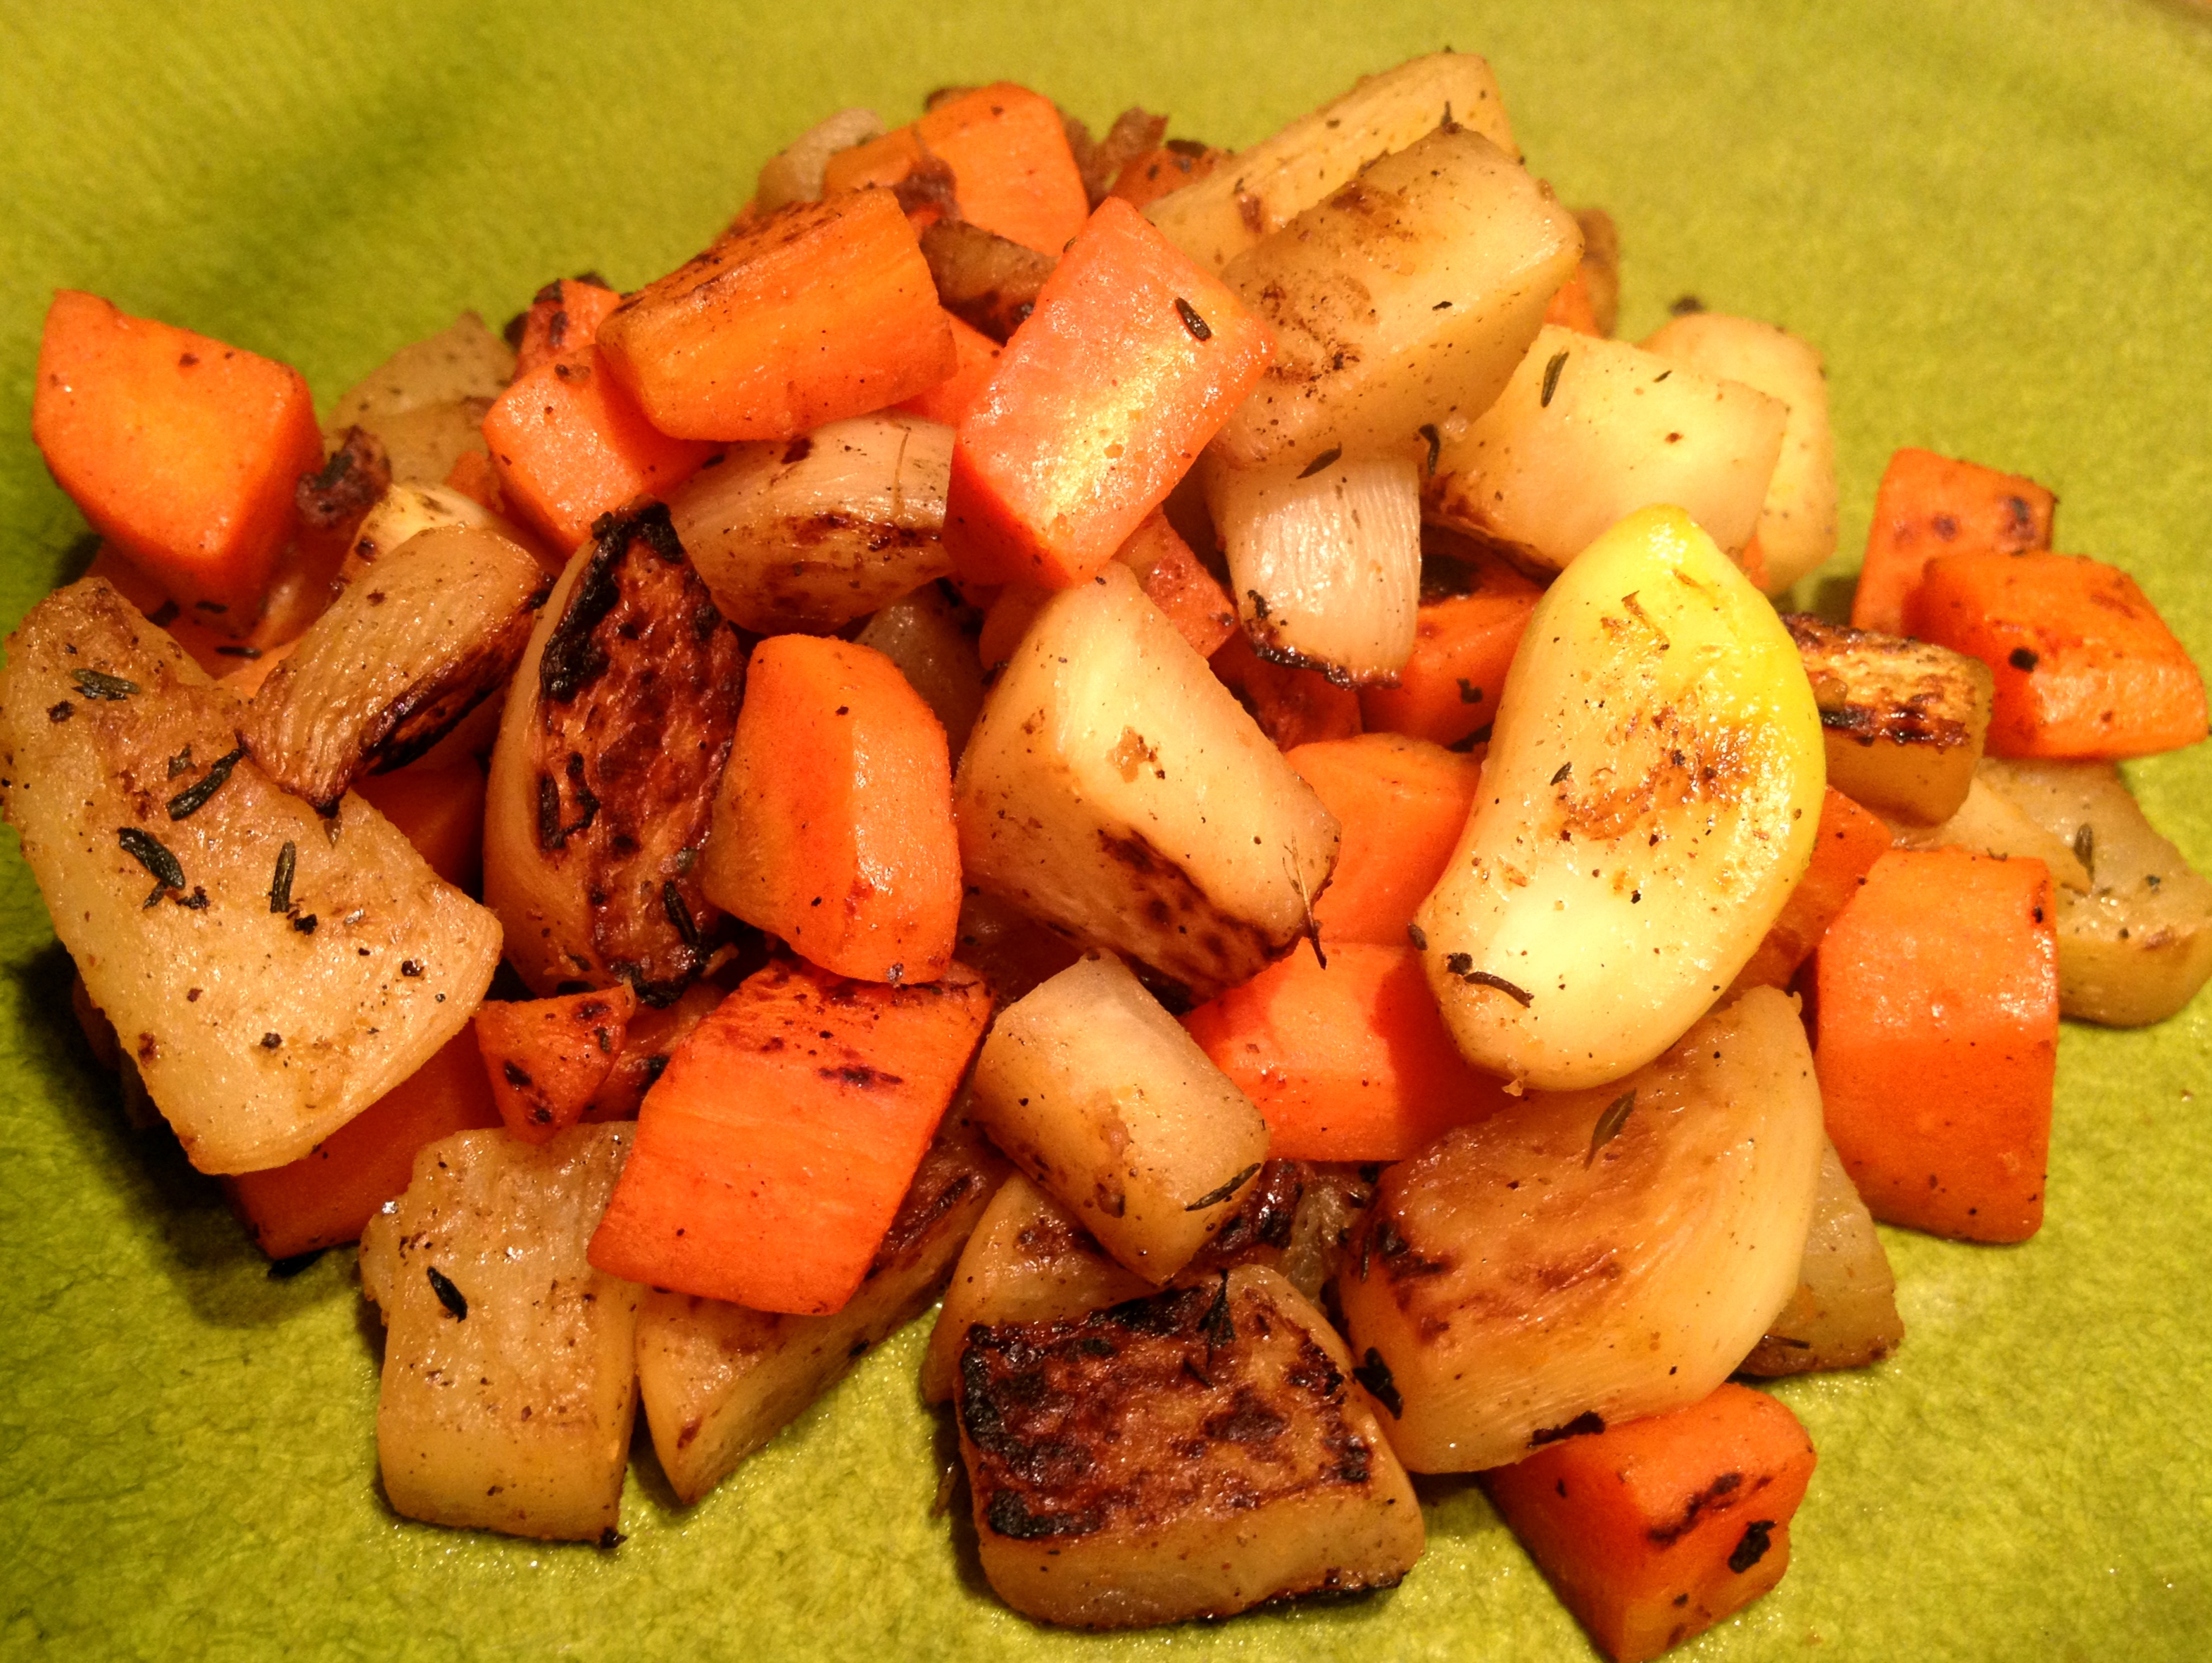
  • 15-20 small red potatoes, cut in half
  • 3 cups sugar snap peas, strings removed
  • 3 ounces slab bacon (or other smoked fatty pork product)
  • 1 preserved lemon (a regular lemon would also work), flesh removed and rind sliced into slivers
  • 1 tablespoon butter
  • 8-12 fresh mint leaves

While the squid marinates, slice the potatoes and parboil them in salted water until they are just fork tender. Removed the strings from the sugar snap peas and blanch them in the salted water for just a couple of minutes, taking care to cool them down quickly so that they stay crisp and bright green.

At this point, you can knock off and enjoy a glass or two of a nice crisp white wine or a rose until just before you’re ready to eat.

Cut the bacon into small pieces (you may recognize these as lardon) and render them in a cast iron skillet over medium heat.

Meanwhile, in a second pan, melt the butter with the preserved lemon rind over medium heat. When it has stopped foaming, add the potatoes, cut side down.

When the bacon is starting to crisp but is still meaty, push the pieces to the edge of the pan and add as many of the squid bodies as will fit in a single layer. Cook until the squid turns an opaque white on the bottom and then flip. When the other side turns white, pile them at the edge of the pan and add another layer, repeating the process until all of the squid is cooked.

When the potatoes have browned, add the sugar snap peas and stir until they are just heated through.

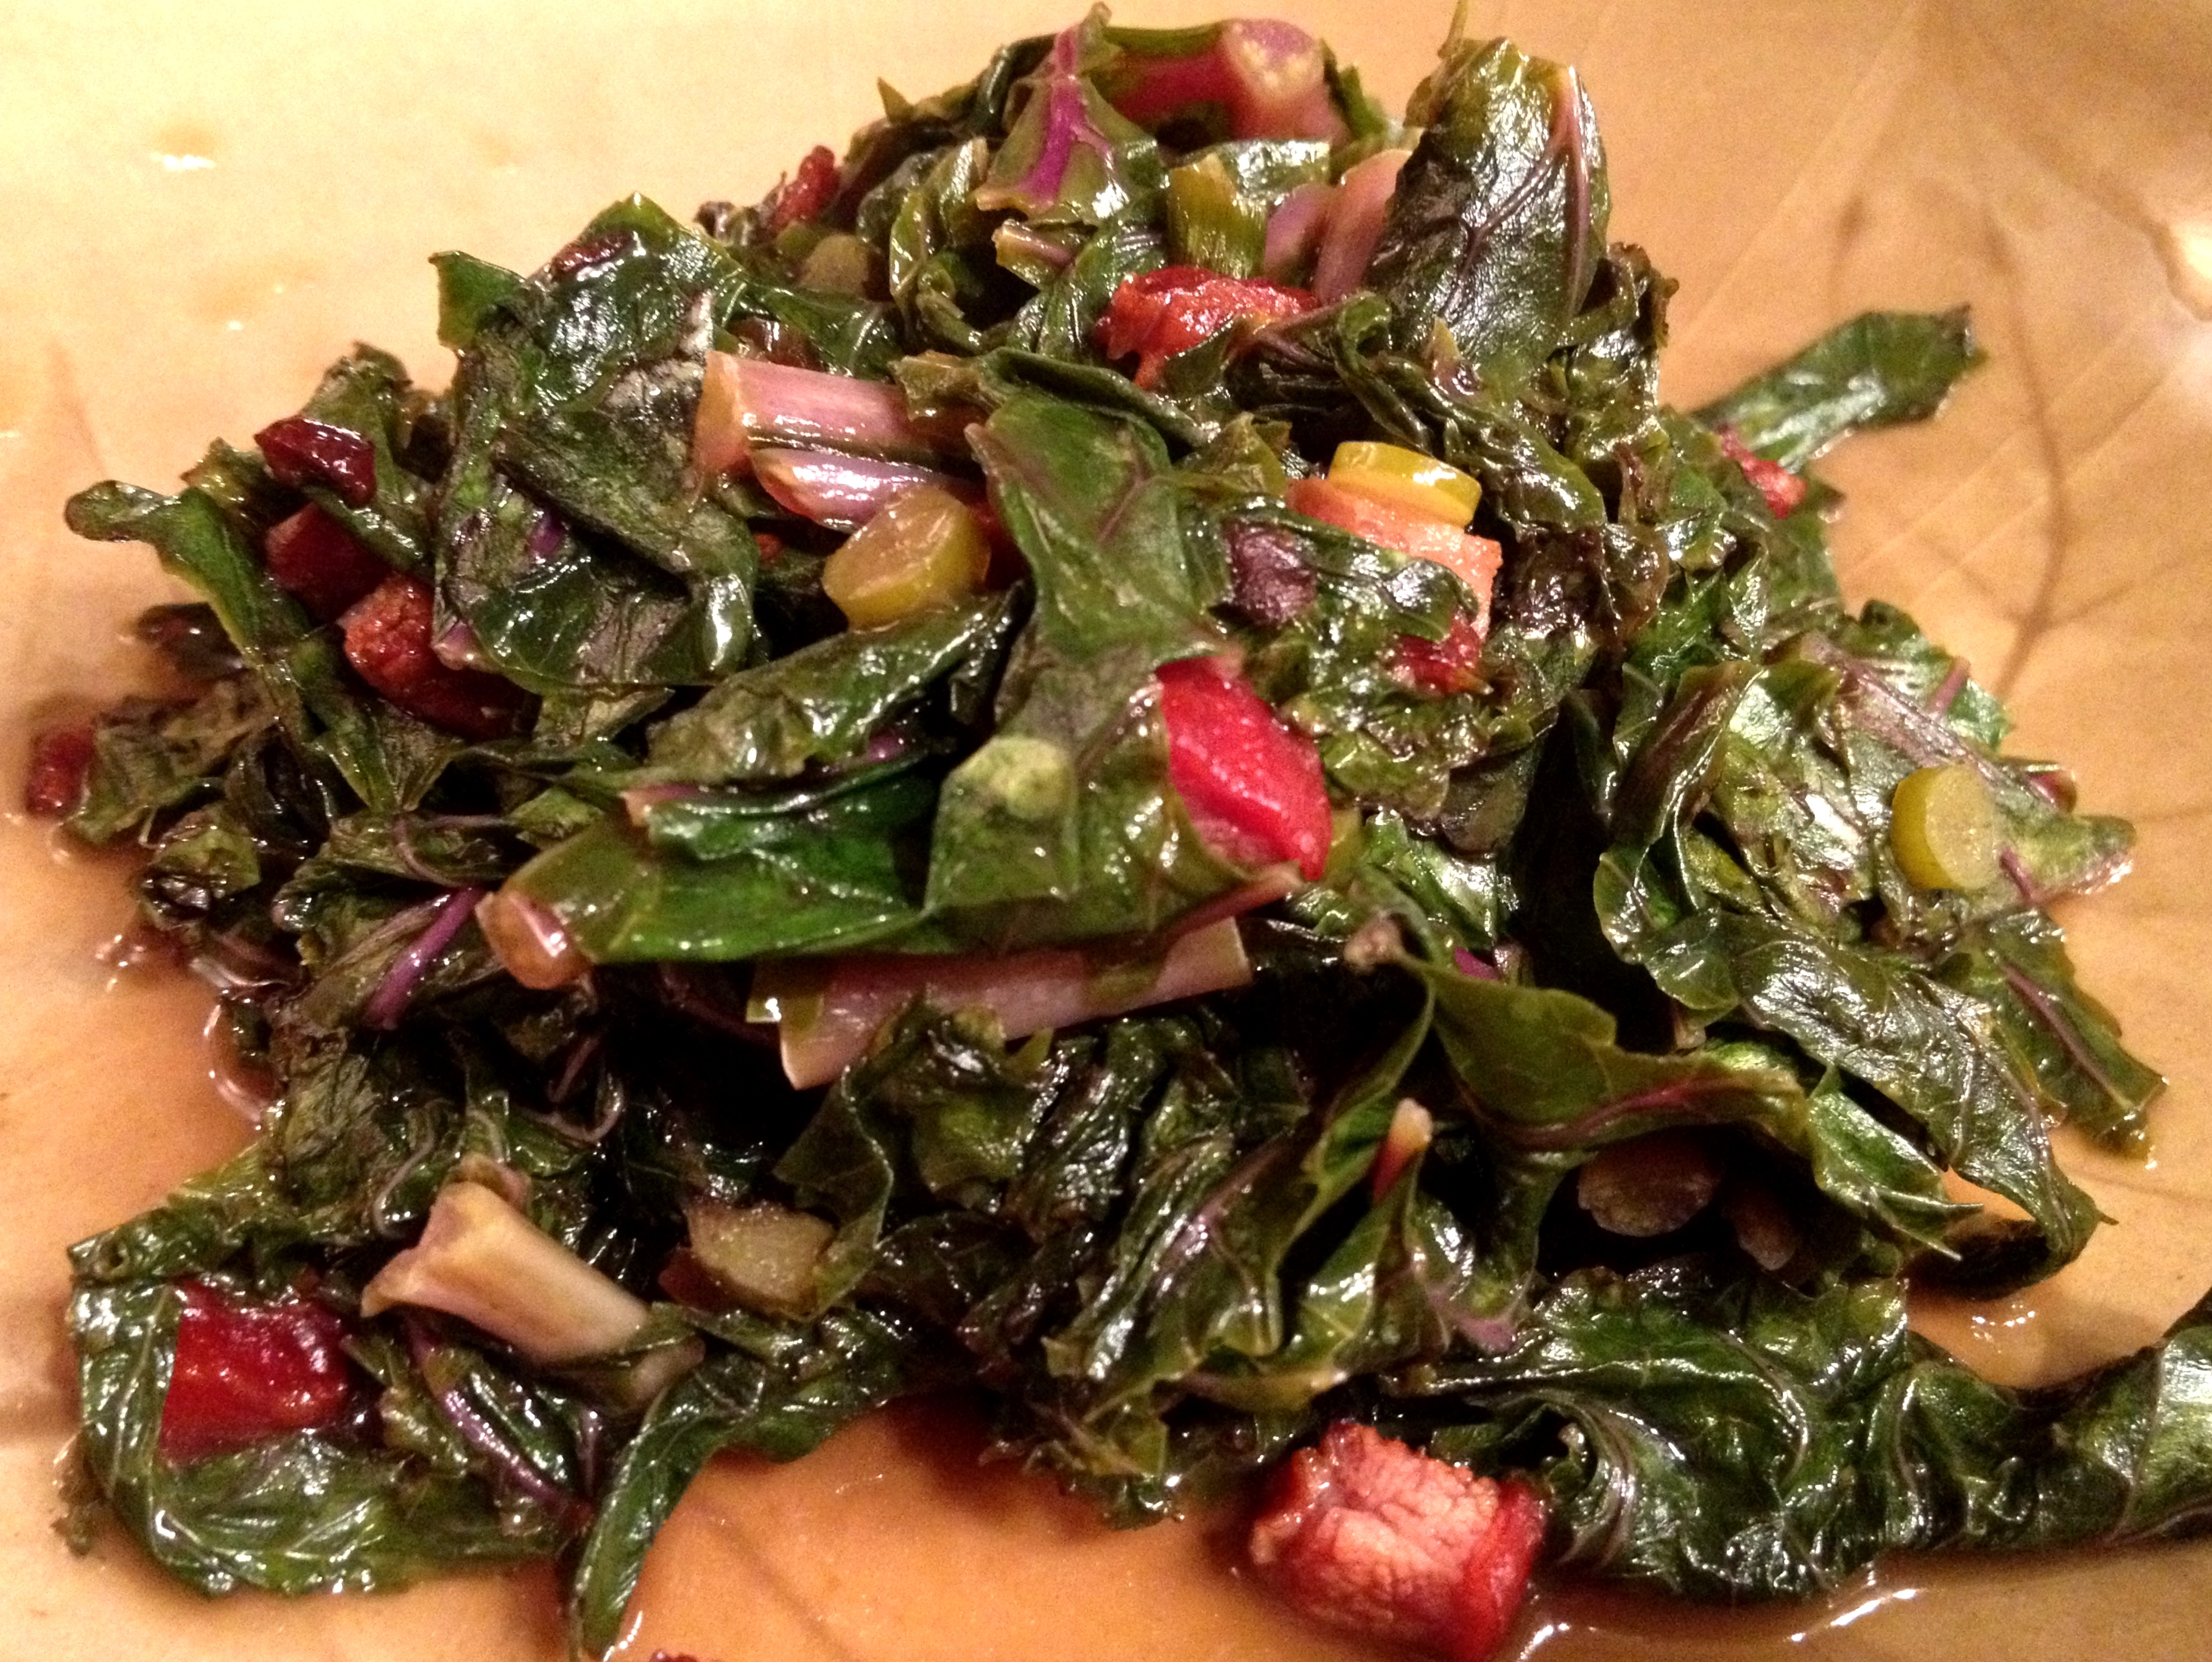
Spoon the potatoes and peas onto a platter and then add the bacon and squid as well as any juices left in the pan. Drizzle the whole thing with scape pesto and top with some thinly sliced mint leaves.

Dana, the squid skeptic, went back for thirds.

Image