Indian Make-In

A sore throat and persistent headache sent me home early today. I had a hunch I might not be leaving my house for a day or so. On my way home I swung by the grocer to grab ginger, chicken broth, chicken thighs, escarole and milk for tomorrow’s coffee.

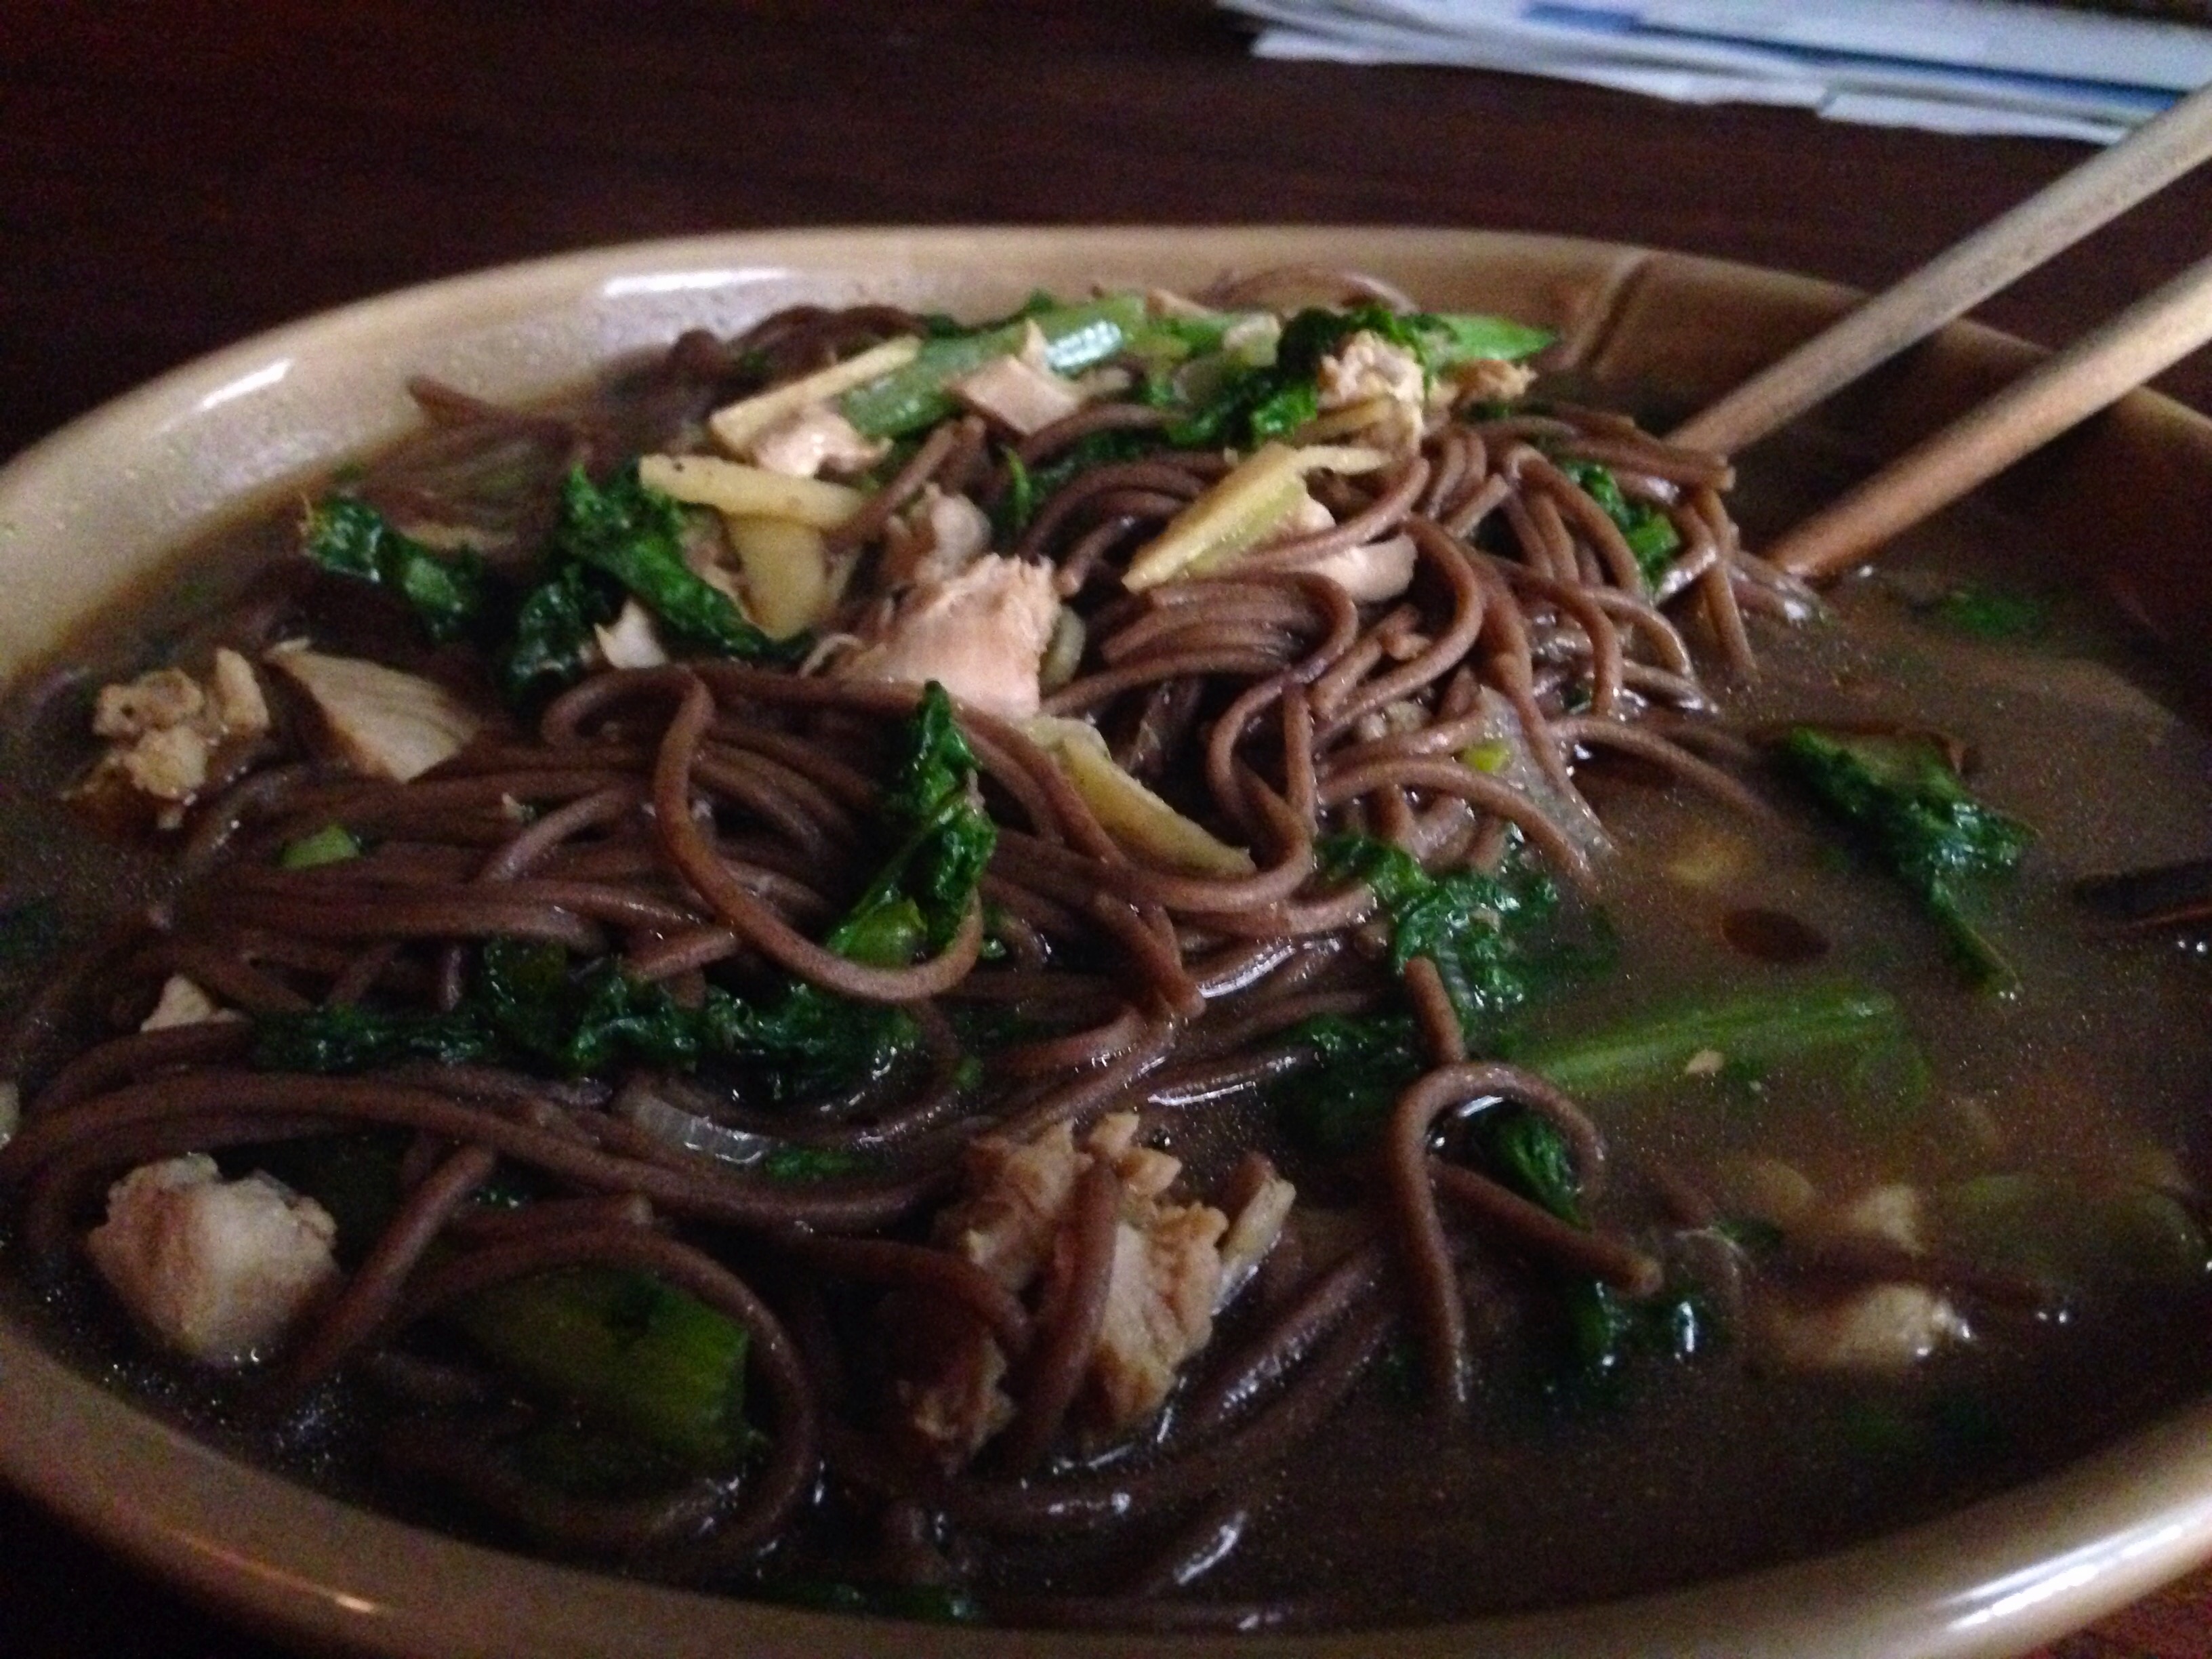
For lunch I whipped up a quick soup by simmering the chicken in broth along with some chopped ginger. When the chicken was cooked through, I pulled it out and added soba noodles. Just before serving, I added the meat (now shredded) along with escarole, soy sauce, scallions, cayenne pepper, cilantro and a few drops of sesame oil.

Chicken Soba Soup

For a brief moment I could breathe clearly and my throat did not ache.

I spent the rest of the afternoon catching up on email and dialing in to various meetings. At some point I managed to knock a nearly full bottle of red wine from the kitchen counter while attempting to make myself a cup of tea.

Red WIne Carnage

Naturally, I did not have any paper towels in the house. Cleanup was quite a chore, as was extracting the glass shard that lodged itself under my pinky nail.

By the time I finished, my stomach was growling. I was craving something spicy that would again offer temporary relief from what I am praying is just a cold. I debated making another bowl of soup, but then I flashed on Friday’s late night Indian takeout, which was truly awful. I swear one of the dishes was a can of chickpeas with some curry powder and vegetable oil stirred in and then heated in the microwave.

Surely I could do better with whatever ingredients I had on hand.

Indian Make-In

  • 1/2 tablespoon whole coriander seeds
  • 1/2 tablespoon whole cumin seeds
  • 1 cup plain whole milk yogurt
  • 1/4 teaspoon cayenne pepper
  • 1/2 teaspoon garam masala
  • 1/2 teaspoon turmeric
  • 5 garlic cloves
  • 1 knob ginger (about the size of your thumb, unless you have monster hands), chopped
  • juice of 1 lime (or a Meyer lemon if that’s what you happen to have on hand)
  • salt and pepper
  • 4 boneless, skinless chicken thighs
  • 1 tablespoon ghee (or butter or vegetable oil of some sort)
  • 1 bunch kale, large stems stripped, roughly chopped
  • 1 pinch sugar
  • 1 medium red onion, sliced pole to pole
  • cilantro (if you got it)
  1. Toast the cumin and coriander in a dry cast iron skillet, shaking frequently, until they give off an earthy aroma and darken a bit. Add these along with the yogurt, cayenne, garam masala, turmeric, garlic, ginger, lime juice, a healthy pinch of salt and some black pepper to the small work bowl of your food processor and let run for several minutes. Stir this in with the chicken thighs in a bowl, cover and refrigerate until you decide that you really need to eat. (Overnight would be awesome, but mine sat for about an hour and it was still damn tasty.)
  2. Bring a cast iron skillet up to medium-high heat with the ghee. Fish the chicken thighs out with a fork, allowing the excess marinade to fall back into the bowl before you place them in the skillet. When the thighs begin to brown, flip them over and baste with the pan juices. Flip back and forth a couple of times continuing to baste. Don’t worry too much about the crust that’s forming (provided your pan is well seasoned). 
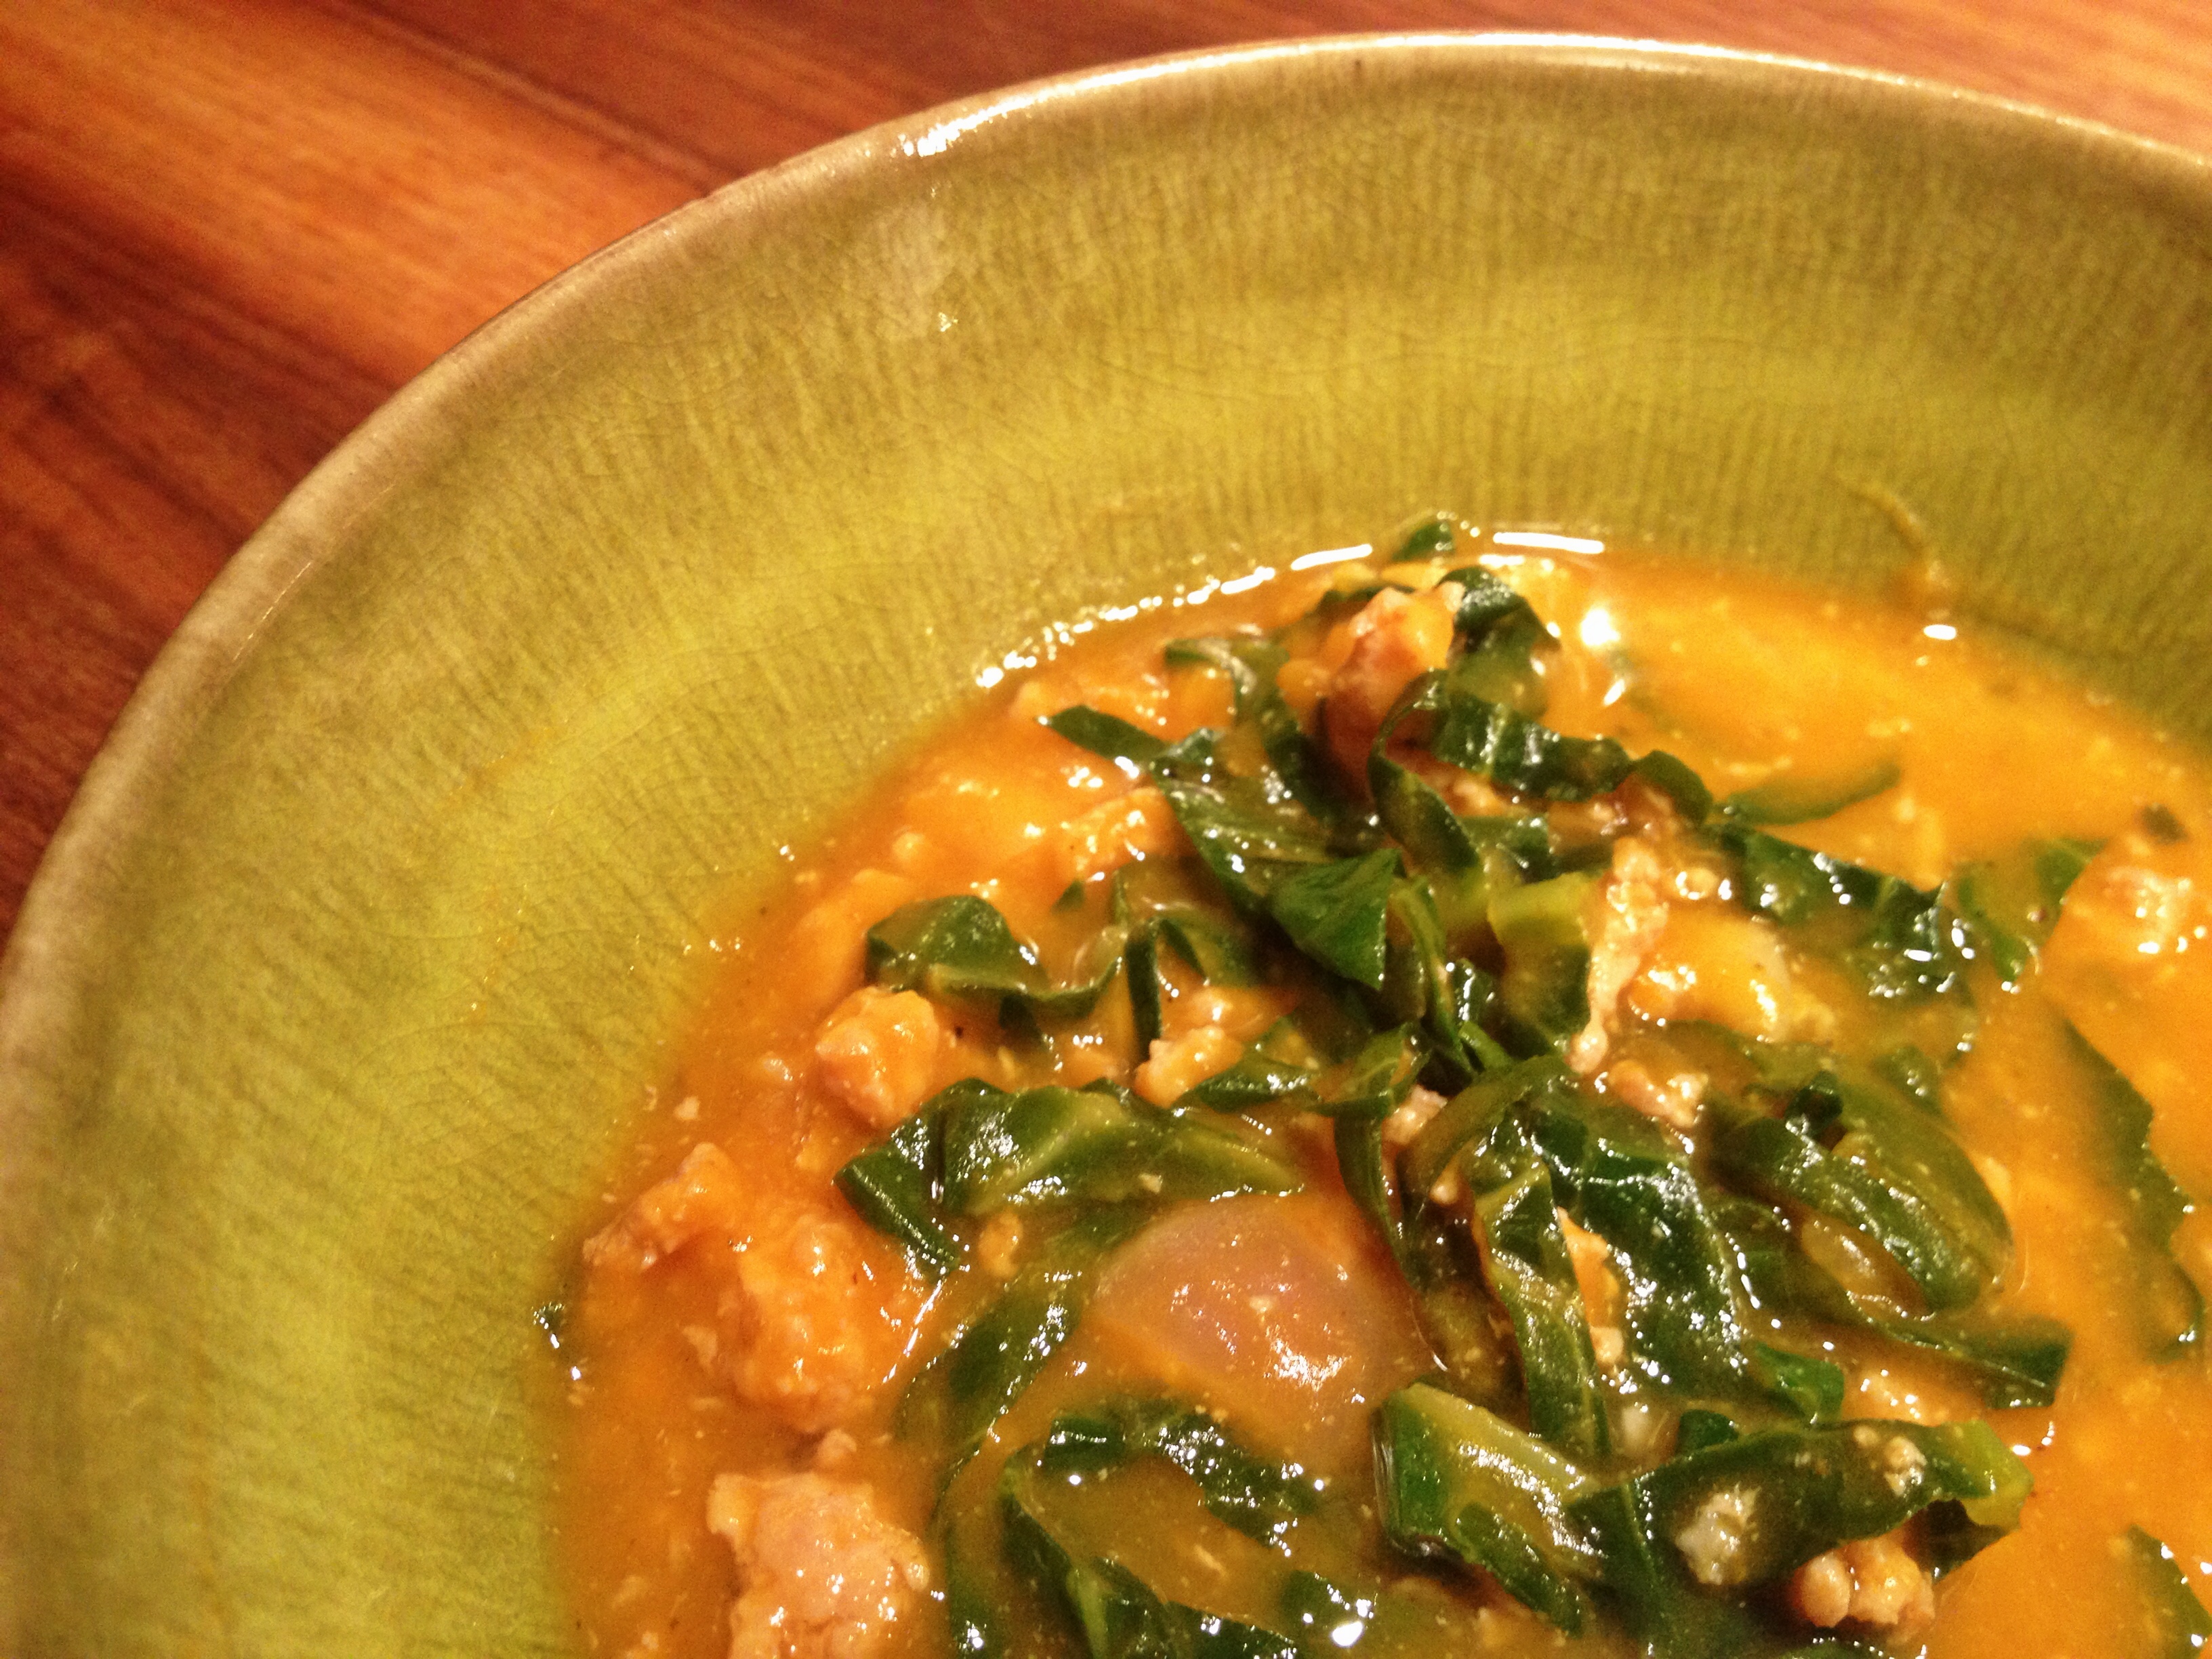
  3. Meanwhile, scrape the leftover marinade into a small saucepan and bring up to medium-high heat. Add the kale in batches, along with a cup or so of water and a pinch of sugar. Let this continue to boil, adding water if needed. (You’re aiming for something approximating spicy creamed spinach.) You may opt to add additional salt, pepper or cayenne as indicated.
  4. When the chicken thighs are done, set them aside and give the pan a good scrape, transferring the crusty bits to your simmering kale. Add the red onion to your skillet and cook, stirring frequently, until limp and nicely charred in spots. Cilantro would be awesome to finish the dish. Alas, I tossed it all into my chicken soup.

Indian Make-In

If I were serving this for company, I would have made a pot of Basmati rice. Instead, I packed half away for tomorrow and added a dollop of mango chutney.

You know what would have been good with this meal? A nice glass of red wine. Sigh.

Curried Black Lentils and Sweet Potato

I’m coming off of back-to-back 60-hour workweeks. In the middle of it all, I threw my back out necessitating a trip to urgent care and a cocktail of controlled substances that I’ve had to meter our carefully so as to remain functional for Tuesday’s fundraising gala and its aftermath.

By Saturday I was off duty and officially on Spring Break. I celebrated by purchasing a bottle of Bulleit Bourbon for my train ride down to Baltimore. That plus some Percocet and a little Zeppelin momentarily had me pain-free for the first time in over a week.

The plan was (and, I think, still is) a road trip down to Nahunta, Georgia to pick up a grill (well, technically a smoker cooker) that the good folk at Lang BBQ Smokers are building to spec for my friend Don. Between my back problems, a death in Don’s family, and a freak mid-March snowstorm over the mid-Atlantic, we’re getting a slow start.

Don flew home from Wisconsin last night via Atlanta (which, incidentally, put him within a four-hour drive of his new grill). His father-in-law had passed away in the wee hours of the morning and he’d had an arduous daylong journey, so I had resolved to cook him a nice meal. My instructions were to make something low in cholesterol and high in fiber, as Don had to swing by the lab for some blood work before we left town.

Rooting through the pantry, I found some black lentils and long-grain pecan rice. The hanging basket under the stairs held an onion and a large sweet potato. In the back of the fridge were parsley and a knob of fresh ginger. This plus an ample spice cabinet would make for a warm, flavorful meal and provide us both with enough fiber to kick off five days of barbeque for breakfast, lunch and dinner.

Curried Black Lentils and Sweet Potato

  • 1 cup black lentils
  • 4 cups water and/or chicken stock
  • 2 tablespoons grapeseed or other neutral cooking oil
  • 1 large onion, diced
  • 1 thumb-sized knob of ginger, peeled and minced
  • 1 tablespoon turmeric
  • 1/2 teaspoon cinnamon
  • 1 teaspoon whole cumin seed
  • 2 teaspoon smoked paprika
  • 2 African bird chilis (or cayenne paper to taste)
  • 1 whole black cardamom pod (optional)
  • 1 teaspoon asafetida (optional, but recommended if you are making the vegan version, as it will lend the dish a richness)
  • 1 large sweet potato, peeled and cut into small cubes
  • 2 tablespoon red wine vinegar
  • 4 tablespoons finely chopped parsley and/or cilantro
  • salt and pepper
  1. Bring the lentils and water/stock to boil in a medium pot, reduce heat, and let simmer for 25 minutes or until tender but still toothsome, seasoning with salt as needed. If you’re making rice to accompany the dish, now is a good time to start that process.
  2. Strain the lentils, reserving the cooking liquid. Add oil to your pot and bring up to medium heat. Add the onions and stir frequently until softened and starting to brown. Add ginger and stir constantly for one minute. Add all of the spices, stirring constantly for another minute. Add the reserved cooking liquid and the sweet potato. Simmer until potato has softened, adding water if the mixture gets too thick.
  3. Pour the lentils back into the pan along with the vinegar and a good dose of freshly ground pepper. Let simmer for a few more minutes, taste and adjust seasoning as needed. Add fresh herbs off the heat.

Curried Black Lentils and Sweet Potato

This recipe makes about four servings. I reheated the leftovers for breakfast. Don had his with rice. I simmered an egg in mine. Imagine this should get us through the first few hours of our snowy spring break road trip.

Black Bean & Sweet Potato Chili

This post contains two recipes which, when combined, yield a very nice pot of chili for four. I recommend doubling the bean recipe and setting half aside so that you can throw together quick dinners of tacos, huevos ranchers and the like throughout the week.

Spicy Black Beans

  • 1/2 pound black beans
  • 1 tablespoon lard, bacon drippings or other pork fat
  • 1 small onion, finely diced
  • 4 garlic cloves, peeled and halved
  • 1 bay leaf
  • 1/2 tablespoon dried oregano (or epazote if you’ve got it)
  • 2 dried chili de arbol (or substitute cayenne pepper to taste)
  • salt and pepper
  1. Add the beans to a large pot along with enough water to cover them by a few inches. Bring to a boil, turn off the heat and let them sit for an hour or more.
  2. Add the pork fat, onions, garlic, bay leaf and oregano. Bring back to a boil, reduce heat and let simmer for one hour.
  3. Add the whole peppers and salt and pepper to taste. Let simmer for another 30-60 minutes until the beans are quite soft and the cooking liquid has thickened. Remove bay leaf and chilis, transfer beans and cooking liquid to another container, give the pot a quick rinse, and move on to the next recipe.

Black Bean & Sweet Potato Chili with Hot Beef Sausage

  • 1 tablespoon olive oil
  • 4 links hot beef sausage, sliced into discs (If you can get your hands on Lewis Waite Farm‘s version, I recommend doing so because YUM. But any kind of spicy sausage would yield a great dish.)
  • 2 medium onions, diced
  • 2 tablespoons ground cumin
  • 1 tablespoon sweet paprika
  • 1 teaspoon dried chipotle and/or smoked habanero powder
  • 1/2 teaspoon cinnamon (Trust me on this; it’s your secret weapon.)
  • 2 tablespoons tomato paste
  • 2 tablespoons apple cider vinegar
  • 1 batch spicy black beans (see above)
  • 2 large sweet potatoes, peeled and cut into small cubes
  1. Bring the oil up to medium heat in a large pot. Fry your sausage slices in two batches, allowing them to brown and crisp in places.
  2. Remove the sausage, lower the heat a bit and add your onions. (If there wasn’t much fat left from your sausage, you could add a little more olive oil at this point.) Saute until starting to soften, then add in the spices and cook stirring constantly for one minute. Do the same with the tomato paste.
  3. Dump your reserved beans and sausage into the pot along with the cider vinegar and enough water that everything is just submerged. Let simmer for 30 minutes, then add the sweet potatoes. Let simmer for another hour. You can add water as you go if needed, but the goal is more of a thick sauce than a broth. Taste and adjust seasoning with salt and pepper if needed.

Black Bean and Sweet Potato Chili

I served this garnished with thinly sliced scallions, avocado slices and some Greek yogurt to counterbalance all of that heat.

Sweet Potato Turkey Bisque with Collards

I am still working my way through the last of this season’s CSA share. Olive oil, habanero powder, salt and pepper are the only things in this dairy-free bisque that didn’t come directly from Windflower Farm or a nearby meat purveyor. This came out crazy tasty, which is a good thing since I will be eating it all week.

Sweet Potato Turkey Bisque with Collards

  • 2 pounds sweet potatoes
  • 4 tablespoons olive oil
  • 1 large red onion
  • 4-6 garlic cloves
  • 1/2 teaspoon habanero powder (cayenne would also work)
  • 1 pound ground turkey
  • 1 small sprig fresh rosemary (or 1/2 teaspoon dried)
  • six cups chicken stock (I used eight cubes of my frozen concentrated stock plus a couple of cups of water.)
  • 1 cup apple cider
  • 1 bunch collard greens
  • salt and pepper
  1. Preheat oven to 425. Peel the sweet potatoes and cut them into large hunks of roughly the same size. Place on a cookie sheet and mix with 2 tablespoons olive oil plus some salt and pepper. Pop these in the oven and cook until soft and starting to brown, approximately 15 minutes.
  2. Bring two tablespoons of olive oil up to medium heat in a large, heavy-bottomed pot. Chop the onion, add to the pot and sauté until soft. Press and add the garlic along with the habanero powder, adding more if you like things really spicy. (I used a heaping teaspoon and mine came out pretty damn hot.) Stir constantly for one minute. Then add the ground turkey. Cook, stirring occasionally, until all pink is gone. Season with salt and pepper.
  3. Puree the sweet potatoes, using water as needed to loosen the mixture. Add the purée plus the chicken stock, water and apple cider to your turkey mixture and bring to a boil. Lower heat and simmer for 30 minutes or so. Taste and adjust seasoning with salt and pepper.
  4. Strip the stems from your collards, roll them like a cigar and thinly slice into strips. Add these to the pot and simmer for another 10-15 minutes.

Sweet Potato Turkey Bisque with Collards

Thai Beef with Eggplant

Since my first cardboard box of Lemonheads (slipped to me by my grandmother when my natural-foods-pushing parents weren’t looking), I’ve been hooked on sweet and sour. Give me a package of Fun Dip or some Haribo Gummi Grapefruit Slices over a piece of chocolate cake any day. And my dad’s deep love of peanut butter (all natural, stirring required, of course) introduced me to the notion of sweet and salty at an early age. It took me a little longer to find my way to spicy food but, once I did, it was with the zeal of a convert.

When I first discovered Thai food, it was a revelation. You mean I can have salty, sweet, sour and spicy all at once? In college, my stepdad’s brother Daniel took me to South Berkeley’s famed Thai Buddhist Temple brunch. Daniel being Daniel and me being a religious scholar, we somehow got to eat inside with the monks. This was my first introduction to Thai food cooked for Thai people–and it was HOT. I was seated somewhere in the middle of three long tables arranged in a horseshoe, flanked by serene men in saffron robes. I did my best to smile sweetly while tears and worse poured down my face. And still I loved it.

At the beginning I was satisfied with just about any Thai food but, over the years, I’ve become more discriminating. While I still love that unique flavor bomb (did I mention umami?), I find that many places dish up gloppy, sickly sweet sauce, overly starchy noodles, and way too much low-grade cooking oil for my stomach to properly process.

And so I save myself for those special Thai meals when the ingredients are fresh and each dish is like a symphony where you can pick out and appreciate the individual components but the whole is somehow greater.

In the meantime, I’ve figured out that I can make a reasonable facsimile of Thai food at home using whatever protein, vegetables and herbs I have on hand. The key is in the condiments. The shelves on my refrigerator door always contain fish sauce, soy sauce, Sriracha, rice wine vinegar and sesame oil–all of which will last pretty much forever. A few weeks back, I deployed these ingredients to whip up a Thai Beef Salad and Quick-Pickled Kohlrabi.

Yesterday was my first day off in two weeks. Sheer exhaustion and a badly sprained ankle compelled me to stay home. Luckily, I had plenty of CSA bounty with which to feed myself. For breakfast I had scrambled eggs and tomatoes lightly dressed with salt, pepper, balsamic vinegar, olive oil, and a little fresh basil. Lunch was the aforementioned Plum and Ricotta Salata Salad. By dinner time, I was ready to tackle the eggplant, green beans, onions, Thai red chilies and more of that basil.

This year, my CSA struck up a partnership with Lewis Waite Farm. One can order their pork and beef à la carte along with chicken and dairy products from neighboring farms. Overwhelmed by the choices, I opted for a monthly Carnivore Share. I’ve been trying to eat more meat and have made a commitment to focus on meat that is good for me and good for the planet. My freezer is starting to fill up as, even with dinner guests, four pounds is a lot of meat for me to go through in a month. But I imagine the stash will be quite welcome come winter.

Carnivore Share

I’m having fun toying with new cuts. Earlier this week, I cooked the lamb rib chops pictured above and ate them over an arugula and tomato salad. Last night, with my friend Louis on his way over, I was ready to tackle the eye round beef from my previous month’s share. While I was unfamiliar with eye round, I could tell by eyeballing it that this was a lean cut probably best suited for stewing or braising. But there was only half a pound of it, which didn’t seem worth a slow and low cook. I decided to try to tenderize it by slicing it thinly against the grain, cooking it quickly at high heat, and using a marinade with a good bit of acid. The resulting dish was so good that, sadly, there were no leftovers to pick at this morning.

Eye Round Beef

Thai Beef with Eggplant

  • 4 tablespoons soy sauce or tamari
  • 1 tablespoon fish sauce
  • 1/2 teaspoon sugar
  • 1 tablespoon rice wine vinegar
  • 1 tablespoon Sriracha
  • 2 tablespoons thinly sliced basil leaves
  • juice of 1 lime
  • 1 Thai red chili, seeded and thinly sliced
  • 3 tablespoons canola/vegetable oil
  • 1 large Japanese or other long skinny eggplant, cut into discs
  • 8 ounces eye round beef, sliced thinly against the grain
  • 1 tablespoon minced ginger
  • 1 tablespoon minced garlic
  1. Combine 3 tablespoons of the soy sauce along with the fish sauce, sugar, rice wine vinegar, Sriracha, basil, lime juice, and half of the ginger, garlic and chili in a small bowl.
  2. Heat 1 tablespoon of canola oil in a large pan over medium-low heat. You want it hot enough that a drop of water sizzles but not so hot that the oil is smoking. Add half of your eggplant, cook until lightly browned, flip and then cook until the other side is also browned. (They may seem a bit firm, but should soften up as they slowly steam.) Place the cooked eggplant in a shallow bowl and drizzle half of the marinade over the top.
  3. Repeat Step 2 with the remaining eggplant slices, taking care to shift them to the bottom of the shallow bowl so that they get a chance to soak up the marinade and soften.
  4. Turn the heat up to medium and add your last tablespoon of oil. Then add the remaining ginger, garlic and chili. When these are fragrant but not yet browning, add the beef and cook for three minutes or so, stirring or flipping as needed, until you don’t see any red. Add the remaining tablespoon of soy sauce. Toss the eggplant with its sauce into the pan and stir to combine.
  5. Empty the contents of the pan into a serving bowl and drizzle with the remaining marinade.

Thai Beef with Eggplant

I served this with brown Jasmine rice and some green beans that I had sautéed with onion, garlic, ginger and the other half of the chili pepper. Off of the heat, these were dressed with a sauce made from peanut butter, sesame oil, Sriracha, and soy sauce. Fresh basil leaves went over the top.

Green Beans with Sesame Peanut Sauce

This meal paired wonderfully with a Vinho Verde. Afterwards, we retired to the couch with a bottle of Prosecco, an ice pack, and a Barbara Stanwyck film. Louis was snoring within 30 minutes.

A Note on Chile Peppers

This week continues to be challenging. I didn’t make it home until around 9:00 last night, by which time I was ravenous. I keep corn tortillas on hand for just such a situation. A few tortillas, half a tablespoon of olive oil, a red onion, a sweet red pepper, a jalapeño, some feta and the less brown half of an abandoned avocado became my dinner in about 15 minutes.

Image

The tacos were tasty but, in my haste, I forgot a few key tips for working with chile peppers.

  1. Cut off the tip and taste to assess hotness. Each pepper is unique. I’ve had jalapeños as mild as a green bell pepper. I’ve had jalapeños that were scorching. Let’s just say that my lower lip is looking a little bee stung today.
  2. If the pepper is hot, minimize skin contact. When you cut a pepper, you release capsaicin, the chemical that creates that delicious hot feeling. The more you cut it, the more you release. Some folks recommend wearing plastic gloves. I used to think this was ridiculous–until I met some seriously hot habaneros while making black bean dip. My hands stung for about 24 hours and were tingly for a few days after that. I tried milk. I tried oil. I tried vinegar. I tried harsh detergents. Nothing but time worked. I have yet to buy gloves, but I do make an effort to only touch the outside of the pepper and let my knife do most of the work.
  3. If your hands do absorb the heat, BE VERY CAREFUL what you touch. You can generally gauge whether one of your fingers is tainted it by sucking on it a bit. You could also gauge this by removing your contacts or by touching some mucus membranes (think soft, fleshy pink parts), but I DO NOT recommend this technique.
  4. If you want to minimize the heat, remove the ribs (the white part on the inside) and the seeds. If you are in a hurry and do not bother with this, you may end up with some very zesty tacos. Obviously, if you really want to amp your dish up, go for the whole thing.
  5. Using multiple sources of heat will yield a more complex flavor. In the case of these quick weeknight tacos, I stuck to the jalapeño and some fresh-ground black pepper. But, when I’m making chili or some other slow-cooked dish with layers of flavor, I generally go with a combination of fresh and dried chiles, chile powder, and/or hot sauce.
  6. Use caution when cooking chile seeds. If you’ve got a soup or a stew or some kind of braise going on, no worries. If you’ve got a hot cast iron pan with minimal oil, you may end up burning the seeds. If you live in a small one-bedroom apartment with no cross ventilation, this could be rather unpleasant. Boys and girls, can you say “pepper spray”?

Gumbo in 10 (or So) Easy Steps

I made gumbo for the third time on Friday and was pleased to see that, once you have the basic concepts down, there are an endless number of ways to riff on this tasty one-pot dish. Pictured here is Friday’s creation, which featured bacon, smoked Louisiana sausage, Maine shrimp tails, okra and mustard greens (these first three ingredients being just a sampling of the proteins lurking in my cramped freezer). Some might consider the mustard greens to be heresy, but I thought that they made for some nice flavor and texture contrast.

What follows is a step-by-step documentation of my very first gumbo. By following these steps, you can make a delicious gumbo using whatever meats, seafood, stock and produce you have on hand. It’s a great way to clean out the freezer.

STEP 1  –  Gather a bunch of meat and brown it in batches in a nice big heavy-bottomed pot. In this case, we have duck breast, andouille sausage, kielbasa and smoked hog jowl.

STEP 2  –  While you’re browning the meat, dice your veggies. Celery, onion and green pepper (“the holy trinity” of Cajun cooking) are traditional. Carrot, red bell pepper and garlic are nice additions. You can also add jalapenos or other hot chile peppers, if you’re into that kind of thing.

STEP 3  –  Transfer browned meat to an even bigger heavy-bottomed pot, add liquid and begin to simmer. An odd beer, some leftover red wine, clam juice and homemade stock from last Thanksgiving’s turkey carcass are just fine. (In the case of the shrimp gumbo pictured above, I used the shrimp shells along with some garlic, celery, carrot, a bay leave and whole black peppercorns to make a quick stock. You could also use a ham hock, which is a great thing to keep stashed in the freezer for soup and stew emergencies.)

STEP 4  –  Now it’s time to make the roux. Add approximately as much flour as you have rendered fat from browning all of that meat and start whisking. If you’re low on fat, you can supplement with whatever hard fat you have on hand – butter, schmaltz, lard, vegetable shortening, etc. A cup of fat and a cup of flour will do you right for one large pot of gumbo.

STEP 5  –  Keep whisking. I recommend NPR podcasts to keep you company.

STEP 6 – Now would be a good time to crack open a beer. But don’t stop whisking. The key is not to let it burn.

STEP 7  –  When you can’t stand to whisk any more, you’ve got your roux. If you taste it, it will not be yummy. Do not be scared.

STEP 8  –  Add your chopped vegetables into the roux and stir frequently until they start to soften. Toss in some herbs. Fresh or dried thyme, oregano and basil are all welcome. Cayenne, paprika and other dried chiles can also be added. Then dump it all, plus some bay leaves into the really big pot with the simmering meat.

STEP 9  –  Let is simmer and simmer and simmer. At some point, you’ll want to pull any large hunks of meat out and shred them. Maybe turn the burner off, lid the pot and take a nice bike ride. While you’re out, pick up some really cheap french bread to serve with the finished product. It’s traditional.

STEP 10  –  Fire the burner back up and keep simmering. Taste and adjust seasoning with salt, pepper, whatever hot sauces you have in the fridge, maybe a little more wine, some vinegar, etc. Make a batch of Sazeracs. Make another batch. Make some long-grain white rice. Add some okra, some chopped up oysters, some parsley and anything else your heart desires. Have some more Sazeracs. Just don’t get so drunk that you forget to take a picture of the finished product. Oops.