Dandelion Pasta with Anchovies & Ricotta

With school back in session, Wednesdays are once again a haze. I had hoped to wrap up my budgeting work before leaving the office, but was waylaid by other tasks. I made it home from class around 7:30, my head full of feminist theory and my stomach running on empty. Fortunately, I had a nice bunch of dandelion greens and a well stocked pantry.

This meal paired nicely with the dregs of Saturday’s Cabernet Sauvignon, which had thankfully not turned to vinegar on the kitchen counter. More importantly, it came together in 22 minutes flat, leaving me with enough time to catch up with my sister Upstate and finish those pesky spreadsheets.

Dandelion Pasta with Anchovies & Ricotta

Set a pot of salted water to boil. Bring a couple of tablespoons of olive oil up to medium heat in a large sauté pan. Peel and thinly slice a few cloves of garlic. Rinse and coarsely chop the dandelion greens, removing the ends if they are twiggy. If you aren’t that into bitter things, wait until the water boils and blanch the greens for a couple of minutes. (But, really, why in the world are you eating dandelion greens if you’re not down?) Once the oil is hot enough that droplets of water sizzle, add a few anchovies from your emergency jar and four or five of those small dried chiles that you bought at the fancy cheese shop on a whim (or a healthy pinch of red pepper flakes, which are probably the same thing at a quarter of the price). Stir constantly for a couple of minutes, add the garlic and continue stirring for one more minute. Add the greens to your pan and half a bag of penne to your pot. Stir both occasionally. Grind some black pepper into the greens. When the pasta is just shy of done, scoop it into the pan, allowing some of the water to migrate along with it. Cook for another minute or so and remove from the heat. Give it a quick taste and add salt if needed. (The anchovies may have done the trick.) Top each serving with a heaping spoonful of ricotta, a little lemon zest and juice, and a drizzle of olive oil.

Dandelion Green Penne with Anchovies and Ricotta

Eggs Ovine

The growing season is in full swing, which means that I am spending a fair amount of my time visiting farmers’ markets and community gardens. Yesterday morning took me to one of my favorite spots in the city, East New York Farms.

East New York Farms

East New York Mural

I was home by 1:00pm, laden with produce grown at the farm and in neighboring community gardens. Couple this with my weekly CSA share and you get a refrigerator full of fresh, local, sustainably grown vegetables in danger of going straight into the compost bin.

Matthew and Clint helped me put a dent in my vegetable stash last night. We had a perfect summer supper that required minimal heat: bulgur salad with cucumber, tomato and scallion; hummus with spring onion tops and green garlic; sliced kohlrabi; toasted pita; and green beans topped with toasted walnuts, rye bread crumbs, mint and feta. We finished the meal off with blueberries and a few squares of dark chocolate. We also polished off the better part of a box of rose before heading over to First Saturday at the Brooklyn Museum.

The museum was packed with happy Brooklynites of all ages. Deterred by the lines for the elevator, we made our way up several flights of stairs. Our reward was a glimpse of our friend Monica leading a pop-up talk in one of the galleries. We made plans for a drink later and headed on to The Rise of Sneaker Culture. The exhibit was hot, humid and very crowded. We were about to bail on the floor altogether when we stumbled into the delightful–if not particularly deep–FAILE: Savage/Sacred Young Minds.

Blacklight Foosball

Neon Selfie

After an aggressive round of black lit selfies and a video game in which one has to search for parking on the streets of NYC, we headed outside to cool off and plan our next move. We settled on Gold Star Beer Counter, which recently opened at the end of my block. Light, refreshing beers were in order.

A round in, Monica joined us. Voices were raised. Lists of 70s movies were made. Beads of sweat were mopped. Classic rock albums were played. An undisclosed number of pale ales, lagers and hefeweizens were consumed. At some point, the lovely woman behind the bar came over to graciously inform us that they had officially closed half an hour ago. And so we settled our tab and sauntered off into the thick summer night.

Needless to say, I did not brush my teeth before bed–and woke up craving a hearty breakfast.

Eggs Ovine

  • 1 tbsp butter (or bacon fat if you happen to have some sitting on the counter from yesterday’s breakfast BLT)
  • 1/2 medium yellow onion, diced
  • 1 clove garlic, minced
  • 1 teaspoon Aleppo pepper (or a pinch of red pepper flakes)
  • 1/2 cup cream cheese left by your cat sitters
  • 2 tbsp milk (as needed)
  • 1 large bunch lamb’s quarters (or baby spinach if that’s what you can get your hands on), stemmed and thoroughly rinsed
  • 1 ounce sheep’s milk feta, crumbled
  • salt and pepper
  • eggs and bread of some sort

Bring the butter up to medium heat in a small, heavy-bottomed pot and add the onion. Sauté, stirring regularly, until the onion is limp but not yet browned. Add the garlic and Aleppo pepper and cook stirring continuously for a minute or two more. Add the cream cheese and continue to stir until you have a thick soup. Add the lamb’s quarters in batches, allowing the hot liquid to wilt the greens. Add a little bit of milk if the mixture is too thick, but the lamb’s quarters will release liquid as they break down. Continue to simmer until you’ve reached the consistency of creamed spinach, stir in the feta until melted. Add a generous amount of pepper and some salt if you think it’s needed. Toast some bread, fry an egg, assemble and enjoy. 

Eggs Ovine

Corn, Bacon & Beet Greens

Tuesday is CSA pickup day. Farmer Fred excels at growing greens, so a big salad has become part of my weekly ritual. But, as the thermometer climbs, the delicate lettuces are giving way to more heat tolerant crops. This week brought iceberg, which should keep just fine in the salad spinner. Tonight’s haul also included the first of the sweet corn. Now this demanded to be eaten right away.

Corn, Bacon & Beet Greens

  • 3 slices bacon
  • 1 spring onion, bulb and greens (or one regular onion and a couple of scallions)
  • 3 ears fresh corn
  • 1 jalapeño (or to taste)
  • 1 bunch beet greens (or other delicate greens such as chard or spinach)
  • 1/2 bunch cilantro
  • salt and pepper

Roughly chop the bacon, add to a cast iron skillet, and bring up to medium heat. Cook, stirring occasionally until bacon is mostly crisp and rendered. Set bacon aside on a paper towel. Chop and add the onion (but not the greens) and stir regularly until limp and somewhat translucent. Mince the jalapeño. Slice the corn niblets off and freeze the cobs for future chowder. Scoop the onions to the side, crank the heat up to high, and add the corn and jalapeños. Let sit for a few minutes until the corn starts to take on color. Stir and repeat a few times, mixing in the cooked onions as you go. Roughly chop the beet greens and thinly slice the onion greens. Add these and stir until just wilted. Season with salt and pepper. Add cilantro and crumbled bacon off the heat.

At this point, you could just grab a fork and dig in. You could also serve it as a side with some fried chicken or even use it to top a salad. I opted to stuff some into a couple of corn tortillas and drizzle with some Tapatio hot sauce and a generous squeeze of lime.

Corn Bacon Beet Greens

Fourth of July weekend I stumbled on a small, nicely-seasoned cast iron skillet in a junk shop up in the Catskills. The remaining corn, bacon and beet greens will make for a most excellent breakfast when topped with a perfectly fried egg.

Perfect Egg Pan

Clams, Dandelion Greens & Hog Jowl

This past weekend’s chilly temperature notwithstanding, Monday’s visit to the Union Square Greenmarket suggests that spring is here to stay. I picked up more young collard greens (color me obsessed), chives, carrots, mint, ramps and dandelion greens. Last night, having worked late, I dined on sautéed collard tacos augmented by half an avocado that had miraculously stayed fresh while I was out of town for a long weekend. Tonight I departed work on time, leaving me with the energy/blood sugar level to swing by my local sustainable seafood shop for a dozen littleneck clams. Half an hour later, dinner was served.

Clams, Dandelion Greens & Hog Jowl

  • 1 ounce hog jowl (or bacon), finely chopped
  • 1 tablespoon olive oil
  • 1 medium yellow onion, diced
  • 2 garlic cloves, thinly sliced
  • 1 pinch red pepper flakes
  • 1/2 cup white wine
  • 12 littleneck clams
  • 1 bunch dandelion greens
  • zest of 1 lemon
  • salt and pepper

Bring a medium-sized pot with a good fitting lid up to medium heat. Add the hog jowl and olive oil and cook stirring occasionally until the pork is partially rendered. Add the onion and continue to cook stirring occasionally until the onion is soft. Add the garlic and red pepper and cook stirring constantly for two more minutes. Add the wine, raise the heat to high, and add the clams. Cook with the lid on for 10 minutes or so, stirring once or twice, until all of your clams have popped open. Stir in the dandelion greens in batches and cook until just wilted. Add the lemon zest and salt and pepper to taste.

Watching the clams give way to your bubbling broth is mighty relaxing–particularly if you do so with a glass of Sauvignon Blanc in hand.

This would make a killer sauce for linguine. Given that I was cooking for one, I went with a piece of grilled whole wheat sourdough, which did a fine job of soaking up the luscious broth.

Steamed Clams with Dandelion Greens and Hog Jowl

Butternut Mac and Cheese with Winter Greens

I’m headed out of town for a mid-Atlantic tour visiting friends and family. Between finishing up the semester, spearheading the year-end fundraising push at my job, and planning and attending various holiday events, my apartment has become something of a way station. Snow boots and shoes litter the floor. Root vegetables, fondue forks and half-unpacked boxes are stacked on the dining table. The bench in my bedroom is piled high with clothing of indeterminate cleanliness. But it’s the refrigerator that calls out for my attention.

As thanks for his services, I’ve invited my cat sitter over for dinner along with a few friends. (Dinner parties are way more fun than packing.) I will be gone for nine days and there are lots of odds and ends to use up before then. For breakfast, I had a fried egg atop pan-fried butternut squash, onions and fennel. But that still left a couple of pounds of cheese lifted from my office holiday party, two giant leeks left over from last weekend’s oyster extravaganza, an assortment of winter greens from my CSA share, dairy products of assorted “sell by” dates and more butternut squash.

A few months ago, I took my mom to Marcus Samuelsson’s Red Rooster, where we had his sinfully tasty Mac & Greens. A childhood friend has long touted the delight of macaroni and cheese with butternut squash. And so this dish was born.

Butternut Mac and Cheese with Winter Greens

  • 1 large butternut squash, peeled and cubed
  • 4 tablespoons olive oil
  • 2 large leeks, whites and greens slice and rinsed thoroughly
  • 6-8 cups chopped winter greens (kale, collards, spinach, chard, mustard greens, etc.)
  • pinch red pepper flakes
  • 1.5 pounds elbow noodles (You could use shells but, for macaroni and cheese, I am uncharacteristically a traditionalist.)
  • 4 tablespoons butter
  • 1 large shallot, minced
  • 4 cloves garlic, minced
  • 4 tablespoons flour
  • 1.5 cups whole milk and/or heavy cream
  • 2 teaspoons nutmeg
  • 3 tablespoons mustard powder
  • 2 tablespoons Dijon mustard
  • 1/2 teaspoon cayenne pepper
  • 1.5 pounds assorted cheese, shredded (Judging from my taste tests, I’m pretty sure I used white cheddar, gouda and Gruyère. But just about any cheese that melts well will work here.)
  • 1 cup bread crumbs (I used some I’d made from the remnants of a whole wheat sourdough loaf and then frozen a while back, but store bought are cool too.)
  • salt and pepper
  1. Toss the butternut squash with 2 tablespoons of olive oil and cook in a 425-degree oven until tender and just starting to brown. Puree in the food processor, adding a small amount of water if needed. Set aside.
  2. Bring the rest of the oil to medium-low heat in a large heavy-bottomed pot. Add the leeks and cook stirring frequently until they are soft. Stir in the red pepper flakes and chopped greens. Place a lid on and let cook for 10 minutes. Remove the lid, turn up to medium-high heat and cook stirring frequently until all liquid is gone. Set aside in separate bowl.
  3. Give your pot a quick rinse, fill with cold water, add some salt, and bring to a boil. Add the pasta and cook about halfway. Strain and set aside.
  4. Give your pot another quick rinse, add the butter and bring up to medium-low heat. Add the shallot, cook for a few minutes and then add the garlic. Cook for another couple of minutes before whisking in the flour. Your mixture should turn gummy and blonde. Whisk in the milk and/or cream plus the nutmeg, cayenne, mustard, mustard powder, a good pinch of salt and lots of pepper. When the mixture starts to thicken, whisk in the cheese in batches, reserving a cup or two for your topping. Once the cheese has melted, stir in the pureed squash, taste your mixture and add additional seasoning if needed.
  5. Stir the pasta and greens into your cheese mixture and then pour into a greased baking dish. Mix the reserved cheese with the breadcrumbs, salt and pepper. Sprinkle the mixture over the top, set aside and go about your business.
  6. About an hour before you are ready to eat, preheat the oven to 375. Bake for 30-40 minutes until your casserole is bubbling and your one-bedroom apartment is engulfed in the heady smell of melted cheese. If you want to get fancy, run it under the broiler for a couple of minutes to brown your crust. Let stand for 5-10 minutes before serving.

Butternut Mac and Cheese with Winter Greens

This paired nicely with a spinach and red onion salad with a Dijon and red wine vinaigrette. The recipe makes enough that five grown people can go back for seconds–and you’ll still have enough leftovers for your cat sitter to enjoy a home cooked lunch for another four or five days. As if hanging out with this adorableness wasn’t reward enough.

Oona

Hoppin’ John is Health Food

It is with a heavy heart that I announce that Windflower Farm‘s CSA season has come to a close. The winter season starts in a couple of weeks, so you can look forward to reports on root vegetables, hard squashes, and dark leafy greens.

In preparation for the slow and low cooking that these vegetables imply, I took the opportunity to place one last order for meat from Lewis Waite Farm, which partnered with my CSA for the first time this year. I worked from home this morning so that I could meet an unmarked van full of meat on a street corner near my house. Given that I already had a serious stockpile from my Carnivore Share, I may have gone a bit overboard.

Freezer Full of Meat

I took the afternoon off to catch up on some reading for school. I’m taking Contemporary Issues in Food Studies this semester and spent most of the weekend writing a paper on Taste, Culture and the Production of Cool. This week, we are shifting gears to examine the systems that create and perpetuate global hunger.

And so I find myself reading about the impact of The Green Revolution–which increased crop yields but came with a serious consequences in terms of individual health, the environment, economic equality and overall food security–while simmering a large pot of Hoppin’John chock full of whole grains, humane meat, organic legumes and locally-sourced vegetables.

It’s enough to make your head spin.

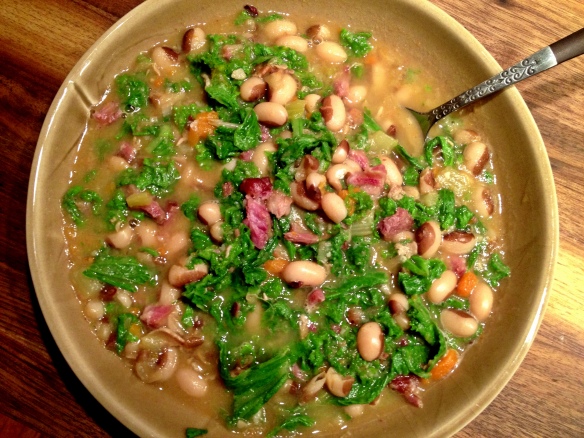
Hoppin’ John with Brown Rice and Kale

  • 1 pound dried black-eyed peas
  • 1 smoked ham hock or pork shank
  • 1 bay leaf
  • 4 whole garlic cloves
  • 2 tablespoons olive oil
  • 1 leek, sliced and rinsed (or an onion)
  • 1-2 jalapeño peppers (depending on their heat and your tolerance for heat), minced
  • 2 bell peppers, chopped
  • 1 teaspoon dried thyme (or a sprig of fresh if you have it)
  • 2 bunches lacinato kale or other dark leafy green, roughly chopped
  • 1 bunch parsley, chopped (optional)
  • apple cider vinegar or vinegar-based hot sauce
  • salt and pepper
  1. Dump the beans into a bowl, add enough water to cover by a few inches, and soak overnight, or for at least six hours.
  2. Cover the hock or shank with water in a large dutch oven. Add bay leaves and garlic and cook at a slow boil for one hour.
  3. Strain and rinse the black-eyed peas, add them to the pot along with a big pinch of salt and continue your slow boil for another 45-75 minutes until the peas are tender but not mushy.
  4. Transfer the pork shank to a cutting board and dispose of the bay leaves. Dump the peas into a bowl, put your pot back over medium heat and add the olive oil. Add your leeks and peppers. Stir occasionally while the vegetables soften, adding thyme after a few minutes. Meanwhile, pull the meat off of the pork bones, chop it up, and add it back to the pot. 
  5. Add a cup of long-grain brown rice, plenty of freshly ground pepper, two cups of the bean liquid, and two cups of water. Taste the broth and add salt if needed. Bring to a boil, then lower the heat, put a lid on it, and simmer for 40 minutes or until your rice is tender. 
  6. Stir in the kale, cover and let simmer for an additional 5 minutes. (I like my kale toothsome but, if you prefer more tender greens, add them a little earlier in the cooking process.)
  7. Mix in the parsley and the black-eyed peas, along with enough of their cooking liquid to give the dish a loose consistency. Add more salt and pepper as needed. I like to round out the flavor with a couple of tablespoons of vinegar. If your peppers aren’t as spicy as you might have liked, you can also use a vinegar-based hot sauce to get that tang.

Healthy Hoppin' John

For a little Hoppin’ John history, another tasty recipe featuring black-eyed peas and greens, and a glimpse at my Dollywood pilgrimage, check out A Hoppin’ New Year.

What the Duck?

On Saturday I took a break from schoolwork to meet up with a friend for brunch (shakshuka for me, a tuna melt for my date) followed by manicures and pedicures (swimming pool blue and fire engine red for me, sunset orange for her).

Afterwards, we swung by the Fort Greene Park Greenmarket where I thought I might pick up something for dinner. I had a guest due at 8:00 and a mountain of reading to get through, so I was looking for a dish that could cook in the oven without much tending. On a whim, I bought a 4.5-pound whole Moulard duck from Hudson Valley Duck Farm.

I arrived home to find my neighbor Chris planting daffodils and pansies in the planters outside our apartment buildings. As we chatted, I set down my heavy tote bag and mentioned the duck inside. Chris, who is no slouch in the cooking department (he had made Momfuku’s Korean pork for a work potluck just the day before), wished me luck, noting that he had never cooked a whole duck. Come to think of it, neither had I.

Back in my apartment, none of the cookbooks included recipes for a whole duck. I flipped through some online recipes, each with more elaborate preparations than the last. It seemed that I should have started preparing my duck a couple of days ago. Then I remembered that the woman working the stand had encouraged me to check out Melissa Clark’s video on The New York Times website. Three and a half minutes later, I was good to go. Clark provides a simple, straightforward technique that you can riff on in an endless number of ways–the ideal recipe, in my book.

I rinsed the bird, hacked off the neck, made small incisions all over the skin (taking care not to nick the flesh), and rubbed it down with salt, pepper, cayenne powder, and some Chinese five-spice powder that I had on hand. Then I set it in the refrigerator uncovered and got down to my reading.Rubbed Duck

A few hours later, I removed the duck and let it come to room temperature while I preheated the oven. I stuffed the bird with large hunks of fresh ginger and garlic and half a lemon left over from a previous meal. At the last minute, I decided to drizzle the duck with a bit of soy sauce and honey.

Aside from some temperature adjustments and one flip, the duck took care of itself for the next couple of hours. As the heady scent filled my apartment, I realized that none of the wines I had in the house would hold up to the bold flavors, so I ran to the wine shop four blocks away. The shopkeeper could smell the duck and spices on me and, after some consideration, we settled on a Riesling and an Old Vine Zinfandel.

The duck rested draped lightly in tinfoil while I prepared rice and purple kale with leeks, soy sauce and rice wine vinegar.

Five-Spice Duck

The duck was excellent–so much so that, by the time we had finished picking, there was nothing left but the carcass and half a breast.

Duck Carcass

I awoke this morning feeling better than expected given how much wine we drank. I was determined to get as much as I could out of my duck. I was also determined to procrastinate on the day’s schoolwork. I made some coffee and got to work.

First up, I chopped the leftover meat and rendered it in a small skillet over medium heat before adding some finely sliced mustard greens. Once the greens had wilted, I added a bit of soy sauce and rice wine vinegar. Breakfast was served.

Duck with Mustard Greens

Following instructions I found online, I put some water in a small pan, added the excess fat and skin that I had trimmed from the duck prior to roasting, and brought it to a simmer over medium heat. An hour or so later, I poured the concoction through a fine mesh sieve and into a gravy separator which I stuck it in the fridge. Once the fat had congealed, I poured off the residual water and was left with some truly glorious looking duck fat. I imagine I’ll use it to pan fry some potatoes and as the foundation for a roux.

Duck Fat - After

While my duck fat rendered, I preheated the oven to 400. I broke the duck carcass into as many pieces as I could manage (really must get a cleaver) and added it to a roasting pan along with the trimmings from last night’s leeks, a bunch of bedraggled scallions I found in the crisper, a few carrots, some celery, and some roughly chopped garlic. I drizzled this with a tablespoon or so of duck fat I had spooned out of the roasting pan last night and popped it in the oven for an hour.

Duck Stock Fixings

The roasted bones and vegetables then went into a medium-sized pot along with a bay leaf, several whole black peppercorns, a pinch of dried thyme, and enough water to cover. This simmered over medium-low heat while I continued studying.

Duck Stock - Before

After a couple of hours, the liquid was a rich brown color and my apartment smelled unbelievable.

Duck Stock - After

I strained the broth into a bowl and stuck it in the fridge. After an hour, I scraped off the fat that had accumulated on the surface and poured the stock through a fine mesh sieve into a container that I stuck in the freezer. I see some killer gumbo in my future.

Pork, Beans & Greens

I flew home last Tuesday from an intense two-week study trip to New Orleans. OK, there may have been a little fun thrown in there. But, since then, it’s been all about work and school. I spent most of the weekend reading and writing, but I did manage to carve out some time to cook those beautiful yellow eye beans from Cayuga Pure Organics that I picked up last month.

Dried beans may seem intimidating, but they are infinitely better than canned and it’s honestly hard to screw them up. They’re also cheap and a great source of nutrition. Ideally, you soak them overnight, after which they should look something like the photo below. But the quick-soak method is just fine. Add the beans along with enough water to cover them to a pot, bring to a boil over high heat for a few minutes, and then let soak for a couple of hours. Whichever method you choose, be sure to drain them.

Soaked Yellow Eyed Beans

Yellow Eye Bean Stew

  • 1 pound dried yellow eye beans, soaked overnight and drained
  • 6 ounces bacon, roughly cut
  • 3 medium onions, chopped
  • 4 carrots, chopped
  • 5 celery stalks, chopped
  • 4 garlic cloves, peeled and halved
  • dried, smoked chili peppers (to taste)
  • 1 pound smoked pork neck bones (A ham hock or even a smoked turkey wing or two would also do the trick.) 
  • 1 bay leaf
  • salt and pepper to taste
  1. Render the bacon in a large dutch oven over medium heat.
  2. Add the onions and cook until wilted but not yet browned.
  3. Add the celery and carrots and cook for a couple more minutes.
  4. Add the beans, garlic, dried chili peppers, neck bones, bay leaf, and enough water to cover.
  5. Bring to a boil and then let simmer until the beans are tender, about two hours. (If by chance you just tossed in a few peppers from your extensive and unlabeled collection, you might want to taste the broth midway through. If it has already reached that sinus-clearing point but is just shy of bringing tears to your eyes, it’s probably time to remove the chilis.)
  6. Remove the neck bones, strip off any remaining meat, chop roughly, and add back to the pot.
  7. Add salt and pepper to taste.

BeforePre-Cook

AfterYellow Eyed Beans with Pork

I love me some beans. And I love them even more when they’re served with greens. I cooked these up on Sunday night, took a nice helping over to my neighbors’ apartment, and have been eating the rest throughout the week along with some mustard greens that I had in the fridge.

Last night, I tossed the beans, raw mustard greens, and some cherry tomatoes with an apple cider and whole-grain mustard vinaigrette.

Yellow Eyed Bean and Mustard Green Salad

Tonight, I heated the beans up with some additional water, added the mustard greens, and simmered until they were lightly cooked. A few splashes of a vinegar-based hot sauce was the finishing touch.

Yellow Eyed Bean and Mustard Greens Soup

Sardines and Greens

Kindly neighbors collected my CSA share on Tuesday. A bag full of fresh produce on your doorstep is a welcome sight after a 13-hour workday, but it was all I could do to shove the vegetables into the refrigerator alongside the remnants of last week’s haul. Tonight’s meeting was canceled, leaving me with a single, glorious unscheduled evening. I got home from class around 8:00, eager for some home cooking. The broccoli rabe and kale from last week were looking a little worse for the wear but still edible–as were the greens that topped this week’s turnips. Now for some protein. I unearthed a can of Portuguese sardines in olive oil from the cupboard. I could work with this.

Sardines and Greens

  1. Bring a large cast iron skillet up to medium heat. Open a can of sardines and drain the olive oil into your skillet. It will start to sizzle as the water cooks out of the oil.
  2. Once this has subsided, add a few cloves of thinly sliced garlic and a big pinch of red pepper flakes. Cook until the garlic slices turn a nutty brown. Add the sardines, mashing with a wooden spoon until you have a coarse paste.
  3. Rinse and roughly chop a big pile of dark leafy greens. I used the aforementioned kale, broccoli rabe and turnip greens, but pretty much any hefty greens will do. Add these to the pan, stirring between batches to wilt them and make room for more. (If any of the greens have thick stalks, be sure to add these first so that they have a little more time to cook.) Keep stirring.
  4. When the greens looks ready, add salt, pepper, the zest of half a lemon and some chopped parsley if you have it. Pile the greens in a bowl and squeeze fresh lemon juice over the top. 

I bet this would be tasty as a sauce for whole wheat pasta with toasted breadcrumbs sprinkled on top, but I opted for a scattering of ricotta salata, a Brooklyn Lager and an old Law and Order episode. It’s been a long week.

How to Cook Greens

Dark leafy greens are one of my diet mainstays. The darker, the better. They’re packed with nutrients, including vitamins A, C and K. They’re high in fiber. They provide a nice dose of calcium and iron. They keep well in the fridge. They’re delicious. And they can be your dinner in under 20 minutes…

Image

This is a basic technique that I’ve used with collard greens, kale, mustard greens, spinach, dandelion greens, chard, radish greens, turnip greens, broccoli rabe, beet greens, snow pea leaves and arugula. You should riff on it as you see fit based on your tastes and whatever ingredients you have on hand.

  1. Heat some fat in a pan. You don’t need much–a tablespoon or so for a whole mess of greens. You can use olive oil, vegetable oil or something from the pork family, preferably smoked. For the greens picture above, I used an ounce of very lean slab bacon, which I rendered with a couple of teaspoons of olive oil.
  2. Add aromatics. Now you want to flavor your oil with whatever aromatics you have on hand–onions, garlic, ginger, shallots, etc. I am partial to red onion and thinly sliced garlic. Here I used some garlic scapes. I also like to add a little hot dried pepper at this stage.
  3. Add greens. Make sure to rinse them well, as they tend to be gritty. But don’t bother to dry them; the water left on the leaves will help to steam them in the pan. You may want to slice them. If the stems are particularly tough, remove them or add them to the pan first so that they get a head start on cooking. Greens need more or less time to cook depending on their type, the time of year, how mature they are, how cooked you want them, etc. I am partial to greens that still require some serious chewing. Traditional Southern greens are cooked until they are silky and falling apart. If you want them more cooked, you can always add more liquid (water or chicken broth are nice) and even lid the pan.
  4. Finish with salt, pepper and a little acid. Lemon juice, tomatoes, apple cider vinegar and red wine vinegar all add a nice counterpoint to the lush mouthfeel of cooked greens. For the kale above, I used white wine vinegar and regular apple cider, which added a little sweetness to what were some very bitter greens. (A pinch of sugar would also do the trick.) You can also add some more heat and complexity at this point by deploying some hot sauce. You can cook for a bit longer to reduce the liquid if you like, but don’t cook it all away. Pot liquor is delicious!
  5. Make it a meal. Sometimes the greens alone are enough for dinner, particularly if I’ve used andouille or turkey sausage back in Step 1. Sometimes I add a fried egg. Sometimes I serve these up in corn tortillas with feta, salsa and avocado. Sometimes I use the greens as a sauce for whole wheat pasta. I ate this purple kale with some ricotta and a slightly sweet, buttery Vouvray.