Corn, Bacon & Beet Greens

Tuesday is CSA pickup day. Farmer Fred excels at growing greens, so a big salad has become part of my weekly ritual. But, as the thermometer climbs, the delicate lettuces are giving way to more heat tolerant crops. This week brought iceberg, which should keep just fine in the salad spinner. Tonight’s haul also included the first of the sweet corn. Now this demanded to be eaten right away.

Corn, Bacon & Beet Greens

  • 3 slices bacon
  • 1 spring onion, bulb and greens (or one regular onion and a couple of scallions)
  • 3 ears fresh corn
  • 1 jalapeño (or to taste)
  • 1 bunch beet greens (or other delicate greens such as chard or spinach)
  • 1/2 bunch cilantro
  • salt and pepper

Roughly chop the bacon, add to a cast iron skillet, and bring up to medium heat. Cook, stirring occasionally until bacon is mostly crisp and rendered. Set bacon aside on a paper towel. Chop and add the onion (but not the greens) and stir regularly until limp and somewhat translucent. Mince the jalapeño. Slice the corn niblets off and freeze the cobs for future chowder. Scoop the onions to the side, crank the heat up to high, and add the corn and jalapeños. Let sit for a few minutes until the corn starts to take on color. Stir and repeat a few times, mixing in the cooked onions as you go. Roughly chop the beet greens and thinly slice the onion greens. Add these and stir until just wilted. Season with salt and pepper. Add cilantro and crumbled bacon off the heat.

At this point, you could just grab a fork and dig in. You could also serve it as a side with some fried chicken or even use it to top a salad. I opted to stuff some into a couple of corn tortillas and drizzle with some Tapatio hot sauce and a generous squeeze of lime.

Corn Bacon Beet Greens

Fourth of July weekend I stumbled on a small, nicely-seasoned cast iron skillet in a junk shop up in the Catskills. The remaining corn, bacon and beet greens will make for a most excellent breakfast when topped with a perfectly fried egg.

Perfect Egg Pan

Raw Beet Salad with Preserved Lemon Vinaigrette

I spent this past weekend down in Baltimore, where the heat index was in the triple digits. Baltimoreans are a hardy lot. And so I joined them in a series of outdoor concerts, cookouts and stoopside dance parties. At some point I gave up on apologizing as another kiss landed on my glistening cheek. Best to focus my energies on hydration.

Adequate sleep was not among the activities I managed to cram into my weekend. I dozed fitfully–my sweaty, sun-baked body lolling into the aisle as the Bolt But hurtled up I-95–and arrived home just in time to down some takeout before collapsing into bed.

The temperature dropped a bit today, but my body has yet to catch up. What is ordinarily a 10-minute walk to pick up my CSA share took me nearly double. By the time I got home, bags laden with green vegetables, I had lost all ambition to cook. Luckily, Farmer Fred excels when it comes to lettuce and I still had the beets from last week’s share. The salad below came together in less time that it took to eat it.

Raw Beet Salad with Preserved Lemon Vinaigrette

  • 1/4 cup whole milk yogurt
  • 2 tablespoons red wine vinegar
  • 1 tablespoon honey
  • black pepper
  • 1 tablespoon good quality olive oil
  • 1/4 preserved lemon
  • 3 medium beets
  • 2 tablespoons walnut pieces
  • 1 small head green leaf lettuce
  • 3 scallions
  • 1/2 bunch cilantro
  1. Whisk the first four ingredient together in a medium bowl and then slowly whisk in the olive oil. Finely chop the preserved lemon and add to the dressing.
  2. Using a mandoline, slice beets to 3/16″ thick. (If you don’t have a mandoline and your beets are small enough, a vegetable peeler will also do the trick.) Toss the beets with your dressing and let sit.
  3. Toast the walnut pieces, stirring frequently, in a cast iron skillet over medium heat.
  4. Rinse and dry the lettuce. Thinly slice the scallions. Mince the cilantro. Toss everything together in a salad bowl and grab yourself a fork.

Raw Beet Salad with Preserved Lemon Vinaigrette

EAT THIS: Arugala, Radish & Ricotta Salata

Rinse and dry the arugula you picked up in tonight’s CSA share. Toast some walnuts in a cast iron skillet. Thinly slice a radish or two. Shave and then crumble some Ricotta Salata. Whisk up a garlic scape vinaigrette. This is dinner without breaking a sweat, even when it’s 88 degrees and you’re too stubborn to turn on the AC.

Sour Cherry Rosewater Crisp

I first moved to Sterling Place in January of 1997. Come spring, I was delighted to discover that the trees on my block did, in fact, have leaves. Even better, they exploded into flowers just when you needed it most.

There is a tree I am particularly fond of in front of the church at the end of my block. When we first met, this particular tree was an awkward adolescent–its gangliness heightened by what I take to be a grafting error. One branch of the tree flowers pink while the rest flowers white.

I pass this tree at least twice nearly every day. Shorter than the other trees on my block, it demands a certain attention that I suspect is somewhat irritating to those taller than me. As I passed under its branches on Thursday morning, It suddenly occurred to me that those red things dangling down looked an awful lot like cherries. (The fact that it took me 19 years to have this thought likely has something to do with the coffee shop being on the next block.) And so, like the compulsive foodie that I am, I snapped a shot and posted it online in order to crowdsource edibility.

Sour Cherry Tree

The verdict? Yep, you can eat it!

I had thought I might wait until dark to do the deed, but was overcome by the urge on my walk home from the train. I was a bit worried that someone would come out of the church and chastise me, but people mainly seemed amused. A few brave souls even joined me in a nibble. The lower branches were easy work, but the upper branches proved more challenging. I did manage to get a few more by balancing on the tree pit guard (probably not what the block beautification committee had in mind), but eventually had to accept that the rest would be left to the birds and those standing taller than 5’4″.

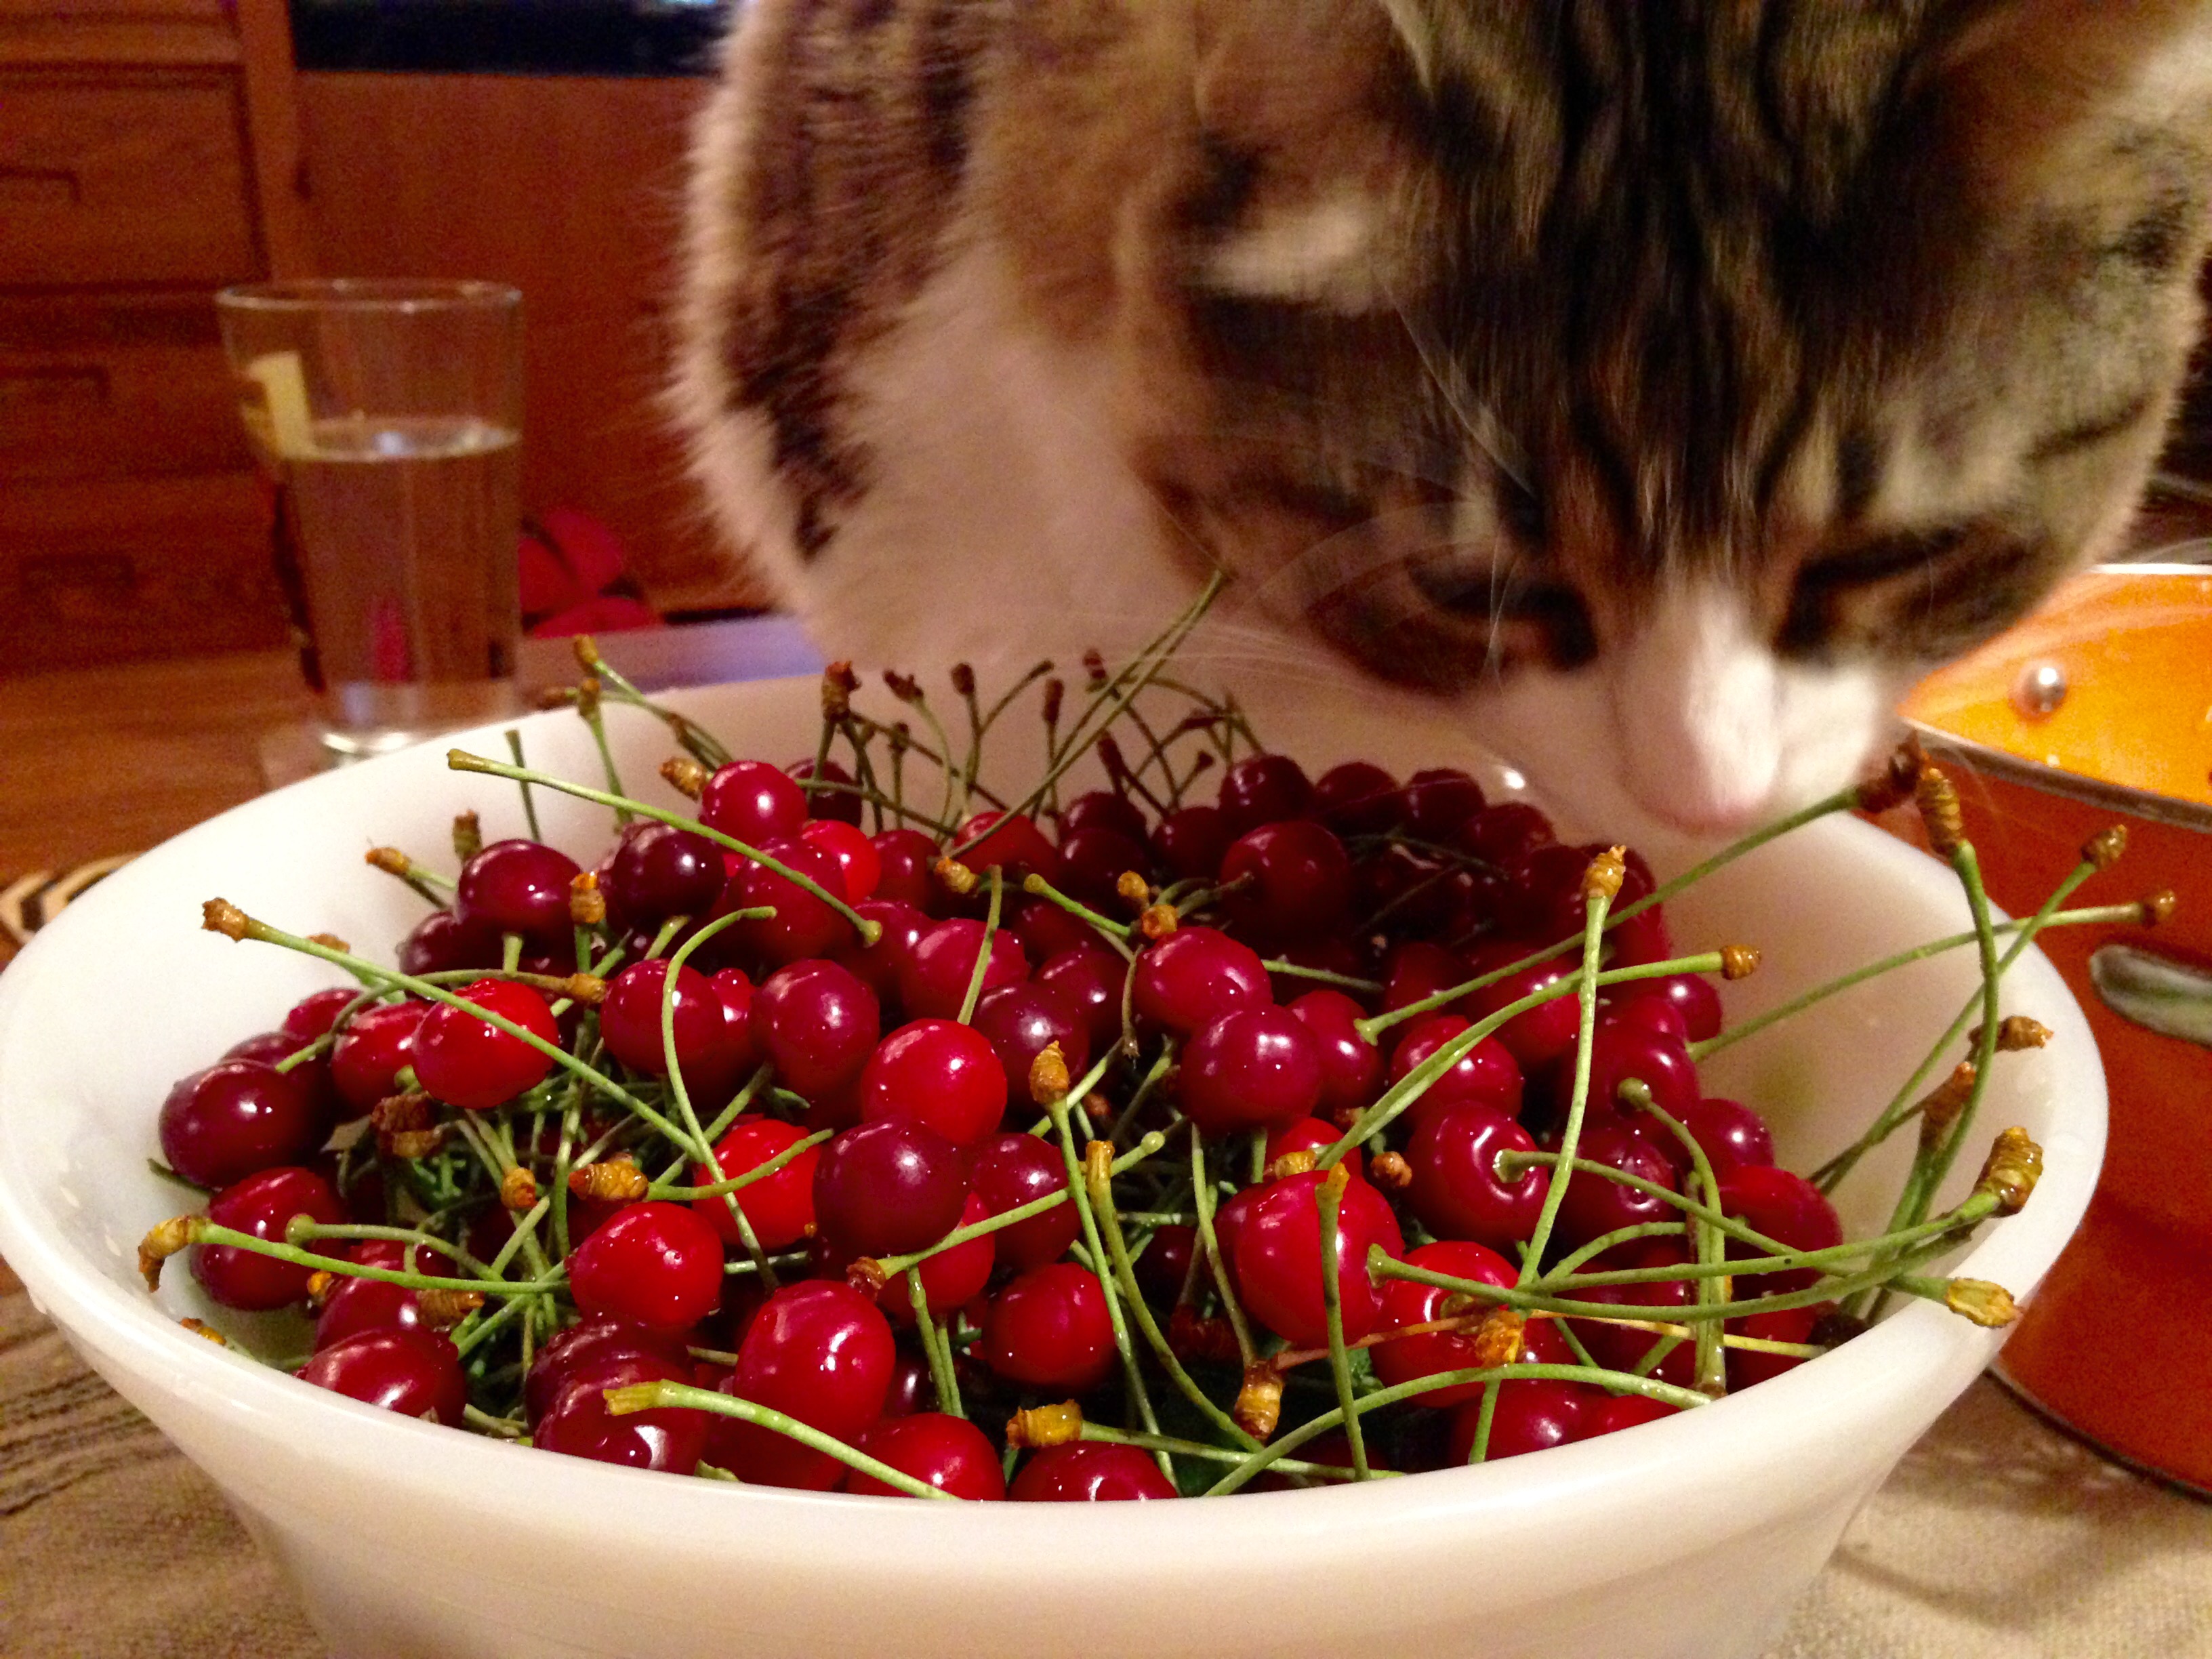
After whipping up a quick salad with this week’s gorgeous red leaf from Sang Lee Farms, I set to work prepping my cherries. Oona offered to help, but her lack of opposable thumbs proved a challenge.

Sour Cherries and Oona

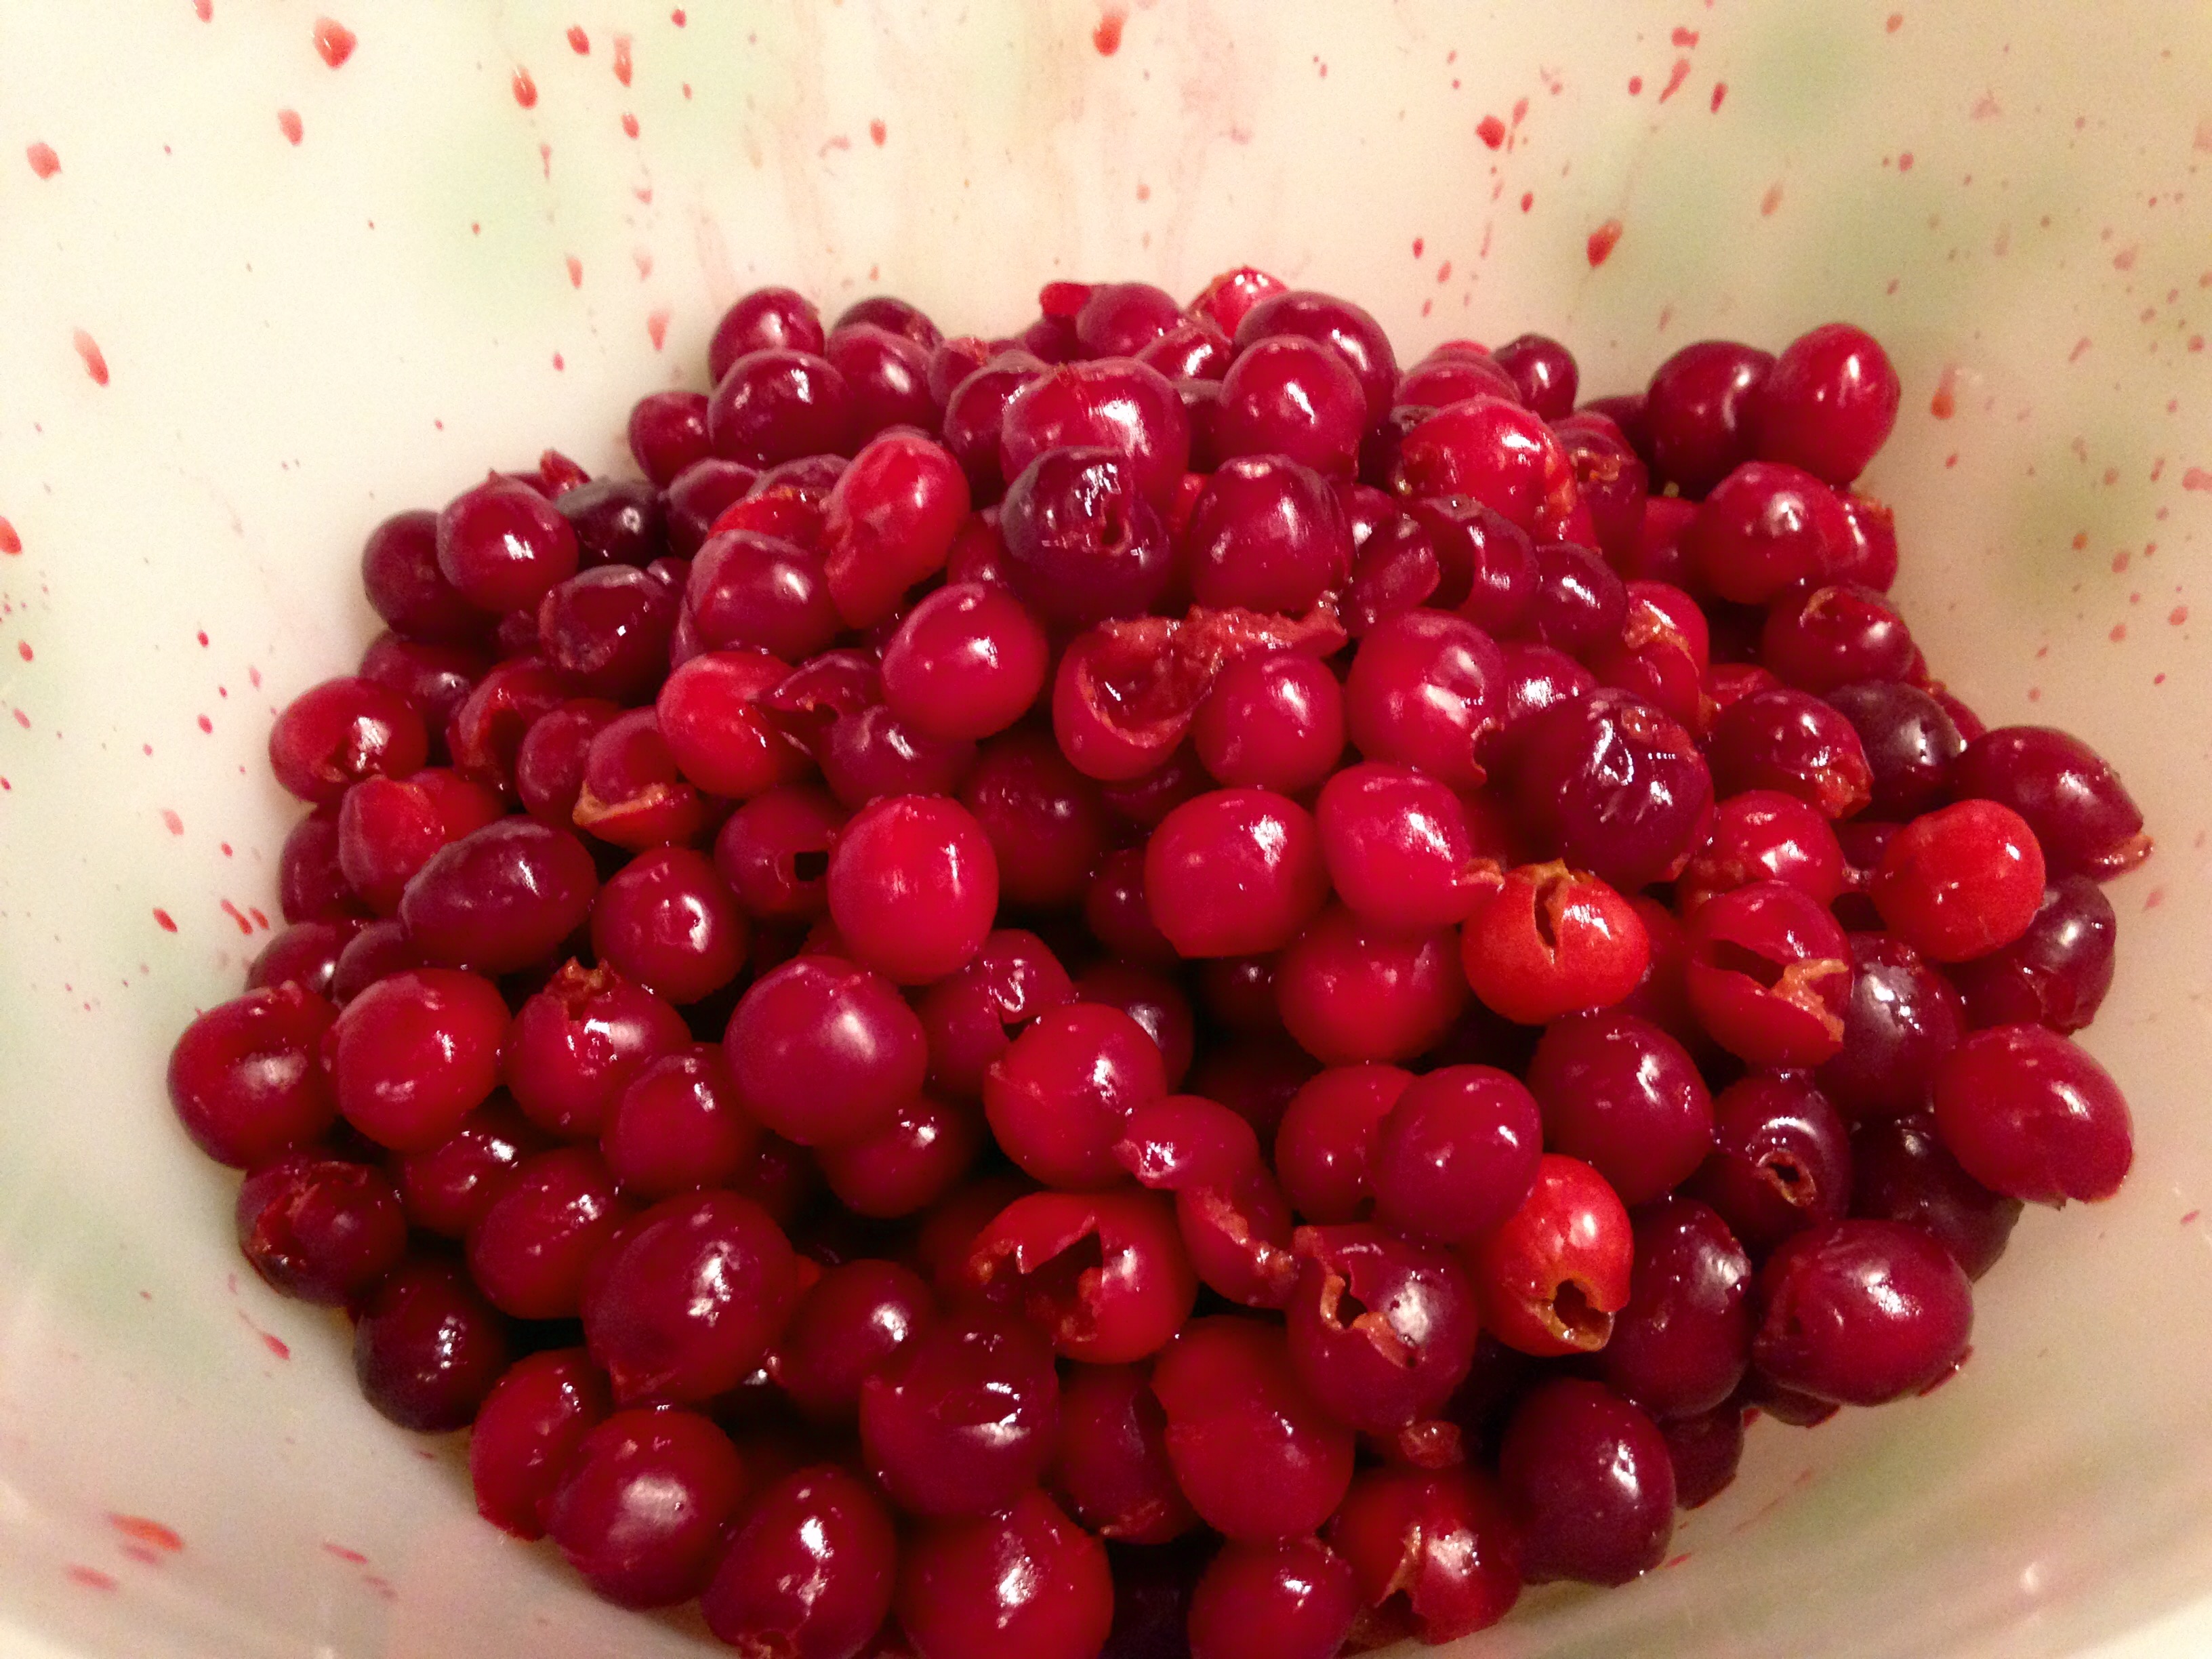
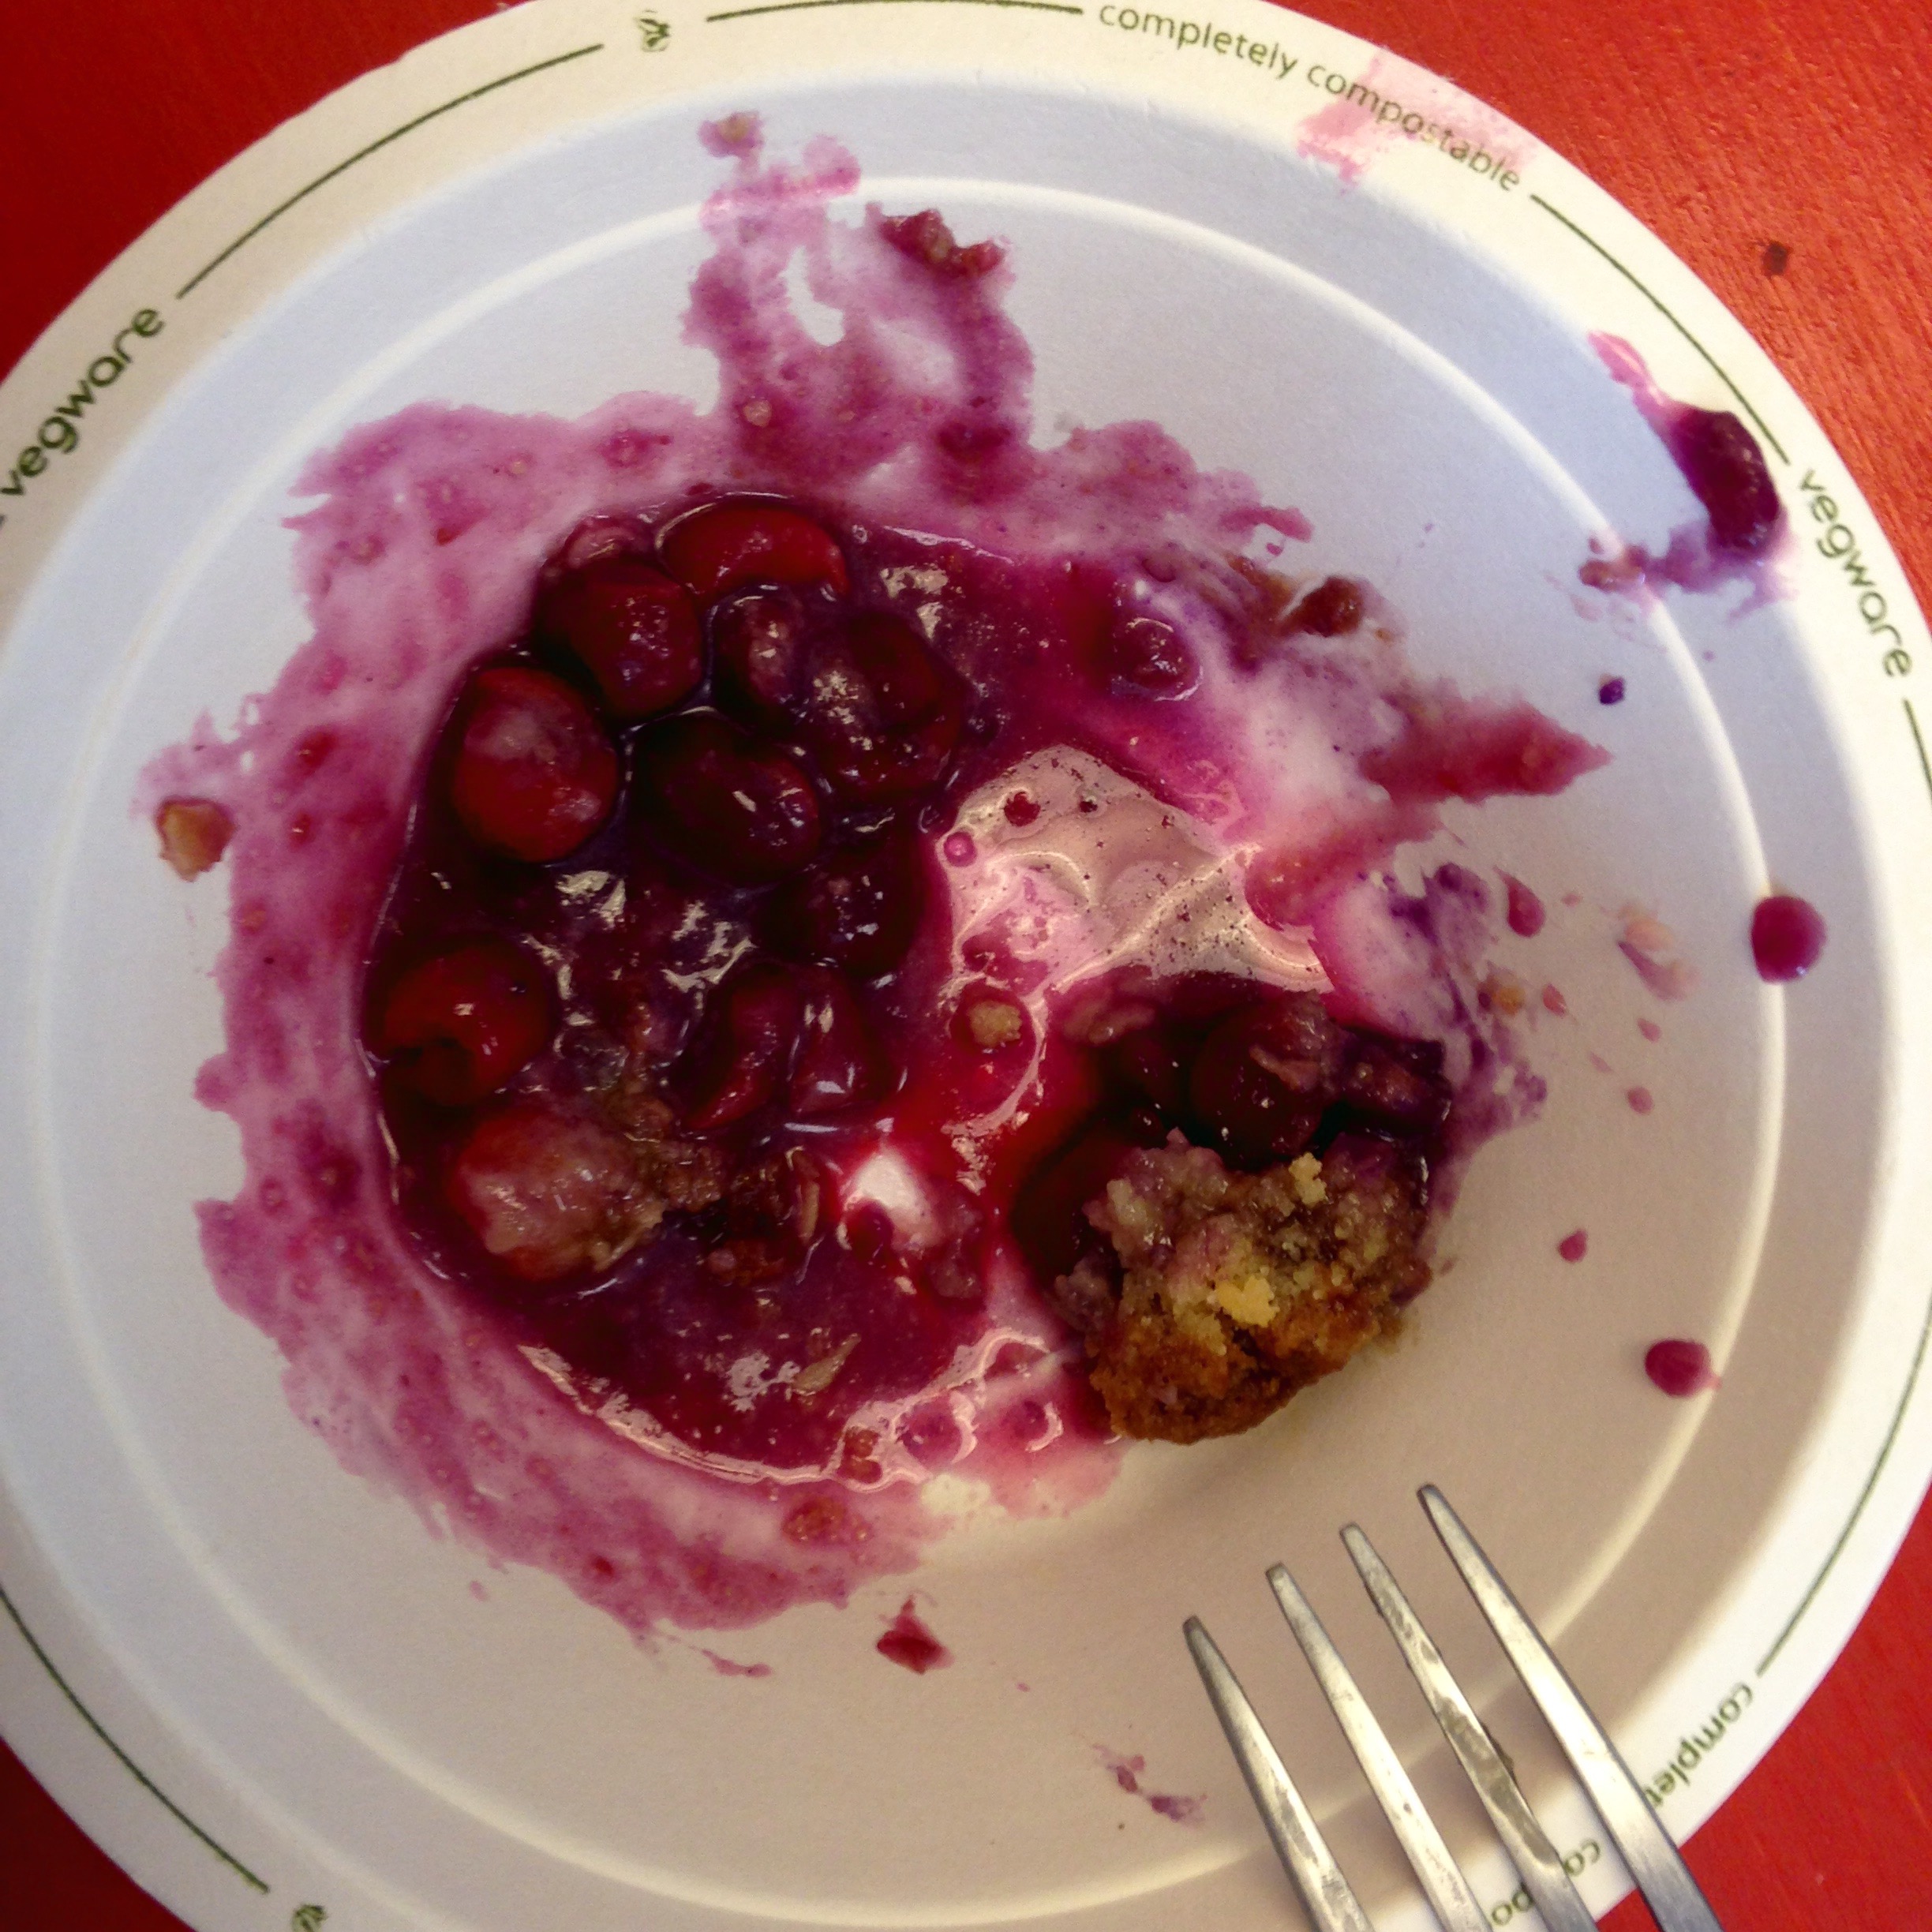
Turns out it doesn’t take as long as you might think to stem and pit 529 (not counting the ones that went straight into my mouth) sour cherries. Within half an hour, I was preheating the oven and assembling my crisp.

Pitted Sour Cherries

Sour Cherry Rosewater Crisp

  • 529 sour cherries (about four cups)
  • 1 3/4 cups sugar
  • 3 tablespoons corn starch
  • 3 tablespoons rosewater
  • 1 lemon, zest and juice
  • 1 cup flour
  • 1/4 cup rolled oats
  • 1/2 teaspoon salt
  • 1 teaspoon baking powder
  • 1 stick butter
  1. Rinse the cherries, place them in a large bowl, and find something to watch on TV. Stem each cherry, transferring it back to another bowl as you do so. Grab stemmed cherries one by one, squeezing with your dominant hand and popping the pit into your other hand. (Under no circumstances should you be wearing white while performing this task.) Drop the pitted cherries back into your first bowl. 
  2. Preheat the oven to 375. Stir 3/4 cups of sugar, the corn starch, the rosewater and the lemon juice and zest into the cherries and let sit while you make the topping.
  3. In another bowl, combine the remaining cup of sugar along with the flour, rolled oats, salt and baking powder. Cut all but one tablespoon of butter into small pieces and drop into flour mixture. Using your hands and pinching the butter with your fingers, combine until it forms a nice crumbly texture.
  4. Pour the cherries into a small baking dish. (If you happen to have a heart-shaped pie tin that you bought years ago at a stoop sale, now would be the time to deploy it.) Layer the flour mixture on top and then dot with small pieces of the remaining tablespoon of butter.
  5. Bake for 45 minutes or so until the fruit is bubbling around the edges (you’ll know because it will be oozing onto you oven floor unless you had the foresight to lay some foil on the lower rack) and the top is golden brown.

BEFORECrisp Pre-Bake

AFTERCrisp Post-Bake

THE NEXT DAY AT THE OFFICE (because, while you are perfectly capable, you probably don’t need  to eat a whole crisp)Sour Cherry Rosewater Crisp

WHAT’S LEFT WHEN YOU FINALLY THINK TO TAKE A PHOTOSour Cherry Crisp Remains

(Last Night’s) Bluefish Cakes

One of my coworkers spent Wednesday with his dad and brother on a boat off the coast of Sandy Hook, New Jersey. It turned out to be a great day for fishing. Jorge returned with more bluefish than any one or two or ten people can reasonably consume. And so he spread the wealth.

Bluefish Filets

I left work last night with two very large bluefish filets tucked into my tote bag. As luck would have it, Rachel was available on short notice. We caught up over a few bottles of wine, the rest of my Newfangled Vichysoisse, and bluefish baked in foil packets with sugar snap peas, asparagus, chives, butter, lemon and a splash of wine.

Baked Bluefish

Despite our best efforts, I was left with quite a bit of bluefish. Not a problem.

(Last Night’s) Bluefish Cakes

  • 1 filet (about the size of a piece of Texas toast) cooked bluefish (or whatever other leftover fish you happen to have)
  • 1/2 jalapeño, seeded and minced
  • 1 small bunch chives (or scallions or plain old onion), minced
  • 1 small bunch minced fresh herbs (parsley, cilantro, etc.)
  • 2 big spoonfuls mayonnaise
  • 1 spoon dijon mustard
  • a few shakes of panko or other breadcrumbs or crushed up crackers if that’s what you got
  • salt, pepper, cayenne, paprika and/or whatever else you heart desires
  • enough oil to coat your cast iron skillet

Bring the oil up to medium heat in a large cast iron skillet. Flake the fish into a small bowl. If a little bit of that delicious butter, wine and lemon sauce slips in, so much the better. Stir in the rest of the ingredients, taste and adjust seasoning to your preference. You want a somewhat gummy texture so that the cakes will hold together. (An egg would probably help with this, but I opted to serve my lone egg fried on top of the cakes.) Use a serving spoon to drop large patties into the pan. Cook swirling occasionally to make sure the oil is distributed evenly and the cakes aren’t sticking. When a nice brown crust is formed on the bottom, flip and repeat.

Bluefish Cakes

Newfangled Vichysoisse

Like my musical appetite, my tastes in food are quite varied. I do my best to at least try everything once–quite an accomplishment given my vegetarian roots. Most things I like enough to try again. But there are a few dishes that just do not work for me.

I have an aversion to the knish, which is tragic given that I lived around the corner from Yonah Schimmel for a good chunk of my 20s. It is the rare gnocchi that turns my crank. The joy of a tamale has also proven elusive, though I did have one last year that made me rethink this stance. (It hailed from East Williamsburg and was stuffed with a generous portion of spicy cheese.)

I am not a big fan of starchy things, it seems. And if you must be starchy, you best not be bland.

CSA season is off to a slow start–no surprise given the miserable winter we had. The Sunday before last, in anticipation of my first pickup, I giddily cleared out my crisper by whipping up a massive batch of potato salad. Two days later, I collected lettuce, asparagus, leeks, beets, carrots, scallions and…more potatoes. Tonight’s share felt more springlike, with cucumber, cilantro, baby bok choy and sugar snap peas joining the asparagus, lettuce and leeks.

As I loaded my vegetables into the crisper, I was ashamed to realize that I hadn’t made a dent in last week’s storage crops. Compounding matters, I now had four giant leeks taking up the space normally reserved for beer.

Potatoes and leeks. The obvious choice is vichysoisse. But, being starchy and not particularly flavorful, this cold potato and leek soup doesn’t hold much allure for me. To quote Kanye: “We can make it better.”

Newfangled Vichysoisse

  • 3 tablespoons butter
  • 4 large leeks, white and light green portions chopped and thoroughly rinsed
  • 2 garlic scapes, sliced
  • 4 large potatoes, peeled and cubed
  • 8 cubes frozen concentrated chicken stock or 1 quart chicken stock of your choice
  • 1 bay leaf
  • 1 pinch nutmeg
  • 3 tablespoons absinthe 
  • 1 cup good quality whole milk yogurt
  • salt
  • black and white pepper
  • chives for garnish
  1. Bring a large pot up to medium-low heat. Add the butter. When the foaming subsides, add the leeks and cook stirring regularly until limp and translucent (about 10 minutes), taking care not to let them brown. Add the scapes and cook for a few more minutes. Add the potatoes and continue to cook for a few more minutes. 
  2. Add the chicken stock, bay leaf and enough water to just cover the potatoes. Bring to a boil. Reduce the heat, pop a lid on and allow to simmer for 30 minutes or so until the vegetables are quite tender. 
  3. Fish out the bay leaf. Add the absinthe, nutmeg, a generous pinch of salt, and plenty of black and white pepper. Pop the lid back on and simmer for another 5-10 minutes. 
  4. Remove from heat and add several ice cubes to cool your soup down and thin it out a bit. When cool enough that you are unlikely to cause injury, add the yogurt and purée using an immersion blender or in batches in a standard blender. Taste and adjust seasoning with additional salt and pepper.

If lunch is a distant memory, you can eat your Newfangled Vichysoisse lukewarm or even hot, but this soup really shines when served cold. (Just remember that, as with most cold foods, it may need more salt.) Either way, be sure to garnish with a generous sprinkle of snipped chives. I bet some rye croutons would be awesome too.

Newfangled Vichysoisse

Beluga Lentils with Lamb’s Quarters, Caramelized Red Onion & Feta

This weekend was full of good friends, glorious sun, and decadent meals. Highlights included a wonderful belated birthday dinner for Louis at Monument Lane (get the smoked potatoes!); a glorious birthday brunch for Sari at Maison Premiere (oysters, custom cocktails, and a delightfully flirtatious server); and Oriana’s amazing book launch party (featuring aerialists and a rousing performance by Hungry March Band–all in a very cool warehouse space/arts community mere feet from the Gowanus Canal). I ended the weekend with a lovely indoor cookout (alas, the sun did not hold) at Sean and Christie’s. I offered up potato salad in a bid to clear the crisper in preparation for the kickoff of CSA season tomorrow. 

The fun came to a screeching halt on this cold, and dark, and dreary Monday morning. I managed to get through the workday with the help of my lovely coworkers. But I did not manage to warm up. By the time I arrived home, I was craving something hot and nourishing. Good thing I stopped off at the farmers’ market Saturday morning.

Beluga Lentils with Lamb’s Quarters, Caramelized Red Onion & Feta

  • 1 cup beluga lentils
  • 1 bay leaf
  • 1 small pinch red pepper flakes
  • 2 tablespoons olive oil
  • 1 medium red onion, halved and thinly sliced
  • 1 bunch lamb’s quarters, large stems removed and roughly chopped (baby spinach would also work)
  • 2 tablespoons sherry vinegar
  • 1/2 lemon, juice and zest
  • 2 ounces feta cheese, crumbled
  • salt and pepper
  1. Add lentils, two cups of water, the bay leaf, the red pepper flakes and a healthy pinch of salt to a small pot. Bring to a boil and then reduce to a simmer.
  2. Bring the olive oil up to medium-low heat in a small skillet. Add the onion and cook, stirring occasionally, until caramelized.
  3. When the lentils are tender (about 25 minutes), turn off the heat and remove the bay leaf. Add the lamb’s quarters in batches, allowing the heat to wilt the greens. Stir in the caramelized onions, vinegar and lemon zest and juice and season to taste with pepper and additional salt. Sprinkle with feta before serving.

Beluga Lentils, Lamb's Quarters, Caramlized Red Onion and Feta

This plus a glass of Red Hook Winery‘s lusty 2009 Cabernet Sauvignon and I was finally, mercifully warm.

Shrimp Tacos with Kale & Avocado Slaw

I got back late last night from my annual trek down to Baltimore for Beth and Don’s (in)famous Memorial Day BBQ. It was, as always, great fun. And I served up some damn fine brisket, if I do say so myself.

Jasmine and Brisket

But three days of hauling coolers, rubbing meat, and tending the coals will wear a girl–and her manicure–out.

Dirty Fingernails

I helped cook and serve everything from sweetbreads and pork belly to elk and musk ox. (I managed to stagger my grill shifts so as to steer clear of the whole raccoon.) Needless to say, meat is not so appealing to me at the moment. Luckily, a swing through my local sustainable seafood shop and the dregs in my refrigerator combined forces for a quick and lovely pescatarian meal.

Shrimp Tacos with Kale & Avocado Slaw

  • 1/2 bunch Lacinato kale, shredded
  • 4 scallions, minced
  • 1 lime, juiced (plus another for your margarita)
  • 1/2 avocado, diced
  • 1 tablespoon vegetable oil
  • 1/2 tablespoon butter
  • 1/2 small onion, thinly sliced
  • 1/2 pound shrimp, peeled
  • 1 pinch sugar
  • 1/4 cup salsa
  • 3 corn tortillas
  • salt and pepper

Toss the kale and scallions with the lime juice and a pinch of salt in a medium bowl. After a few minutes, mix in the avocado and 1/2 tablespoon of oil. Stir occasionally so that everything comes together while you continue on with you dinner preparations. Bring a small skillet up to medium-high heat and a cast iron skillet up to medium heat. Add the remaining 1/2 tablespoon oil and the butter to the small skillet. Toss the shrimp with salt, pepper and sugar in a small bowl. Make a margarita. Add the onion to the small skillet and cook, stirring frequently, until nicely browned. Scoot the onions to the side and add the shrimp. Cook for a couple of minutes, and then flip. Add the salsa and continue to cook, stirring occasionally, until the liquid is reduced. Heat the tortillas in the cast iron skillet, about a minute per side. Assemble your tortillas, topping them with the shrimp, onions and a nice pile of slaw. 

Shrimp Tacos with Kale and Avocado Slaw

EAT THIS: Grilled Asparagus & Chives with Fresh Ricotta

Asparagus, Chives, Ricotta & Breadcrumbs

Grill a bunch of asparagus, a handful of chives, and the heel of some stale whole wheat sourdough in olive oil in a cast iron skillet. Add salt, pepper, a nice dollop of ricotta, and the juice and zest of half a lemon. This would be great with a glass of Sancerre. It would be even better with a whole bottle. Alas, I paired mine with the budget justification for one of two federal grants due in less than 24 hours

Ramp, Feta & Mint Pizza

Having spent much of my week in meetings, I find myself home alone on Friday night desperately attempting to catch up on emails and a couple of writing projects. This is not as bad as it sounds when you consider the fact that I went a little overboard on the ramps during Monday’s farmers’ market expedition and had the foresight to pick up a ball of pizza dough on my way home this afternoon.

It seems that Friday night pizza is officially a thing.

Ramp, Feta & Mint Pizza

  • 10-12 ramps, dirty ends trimmed
  • 1 tablespoon butter
  • 1 small ball pizza dough
  • 1 tablespoon olive oil
  • 1/3 cup ricotta cheese
  • 2 ounces feta cheese, crumbled
  • 20 or so fresh mint leaves
  • salt and pepper
  1. Turn your oven up as high as it will go and remove the pizza dough from the refrigerator.
  2. Bring a large cast iron skillet up to medium heat with the butter. Add the ramps, placing the bulb ends in the skillet and draping the greens, which will cook faster, off the side. When the bulbs are starting to brown, flip the ramps over, When the other side has some color, slide the greens portions in as well. Flip one more time to cook the greens thoroughly, sprinkle with a little salt and set aside.
  3. Give the skillet a quick rinse and pop it in the oven. When the oven is pre-heated, remove the skillet and swirl a little olive oil inside. 
  4. Slowly stretch your dough into a circle approximately the size of your skillet by working your hands around the edges, pulling gently and allowing gravity to assist. Place the dough in the skillet, drizzle a little more olive oil on top and then spread the ricotta cheese in a layer. Add some black pepper, the ramps and the feta cheese. 
  5. Pop the pan in the oven and let cook for 7 to 11 minutes until the edges of the crust are browned. Sprinkle the hot pizza with the mint leaves before serving.

Ramp, Feta & Mint Pizza

This should probably be enough for two people, but I’m having a hard time resisting the half that’s sitting on my cutting board.